Welcome to the exciting world of Excel, your go-to tool for handling data with ease and precision!
Our guide, "How to Enter Data in Excel," is your fun and easy ticket to becoming a data entry whiz in Excel! Whether you're just starting out or already a pro, this guide has all the tips and tricks you need to master Excel's data entry magic.
Enter Data in Excel
Think of Excel as an ocean of possibilities. Entering data in Excel might be hard at first, but don't worry! Our guide has easy-to-follow techniques that will help you master it quickly.
Excel is more than just software. It's a way to be efficient, organised, and handle information. From starting by typing in your first cell to automating complex data patterns, there's something here for everyone.
So, let's dive into the top 10 essential techniques that will transform you into a data entry wizard. Grab your data, roll up your sleeves, and let's get started!
1. Efficient Manual Data Entry in Excel
Skill Level: Beginner
Let's kick things off with the basics, perfect for an Excel beginner or anyone needing a quick refresher. Entering data into Excel is as simple as clicking and typing. But simplicity doesn't mean it's not powerful.
Follow these easy steps to begin your journey into the world of Excel data entry:
1. Open Your Workbook: Launch Excel and open a new or existing workbook where you want to enter your data.
2. Select a Cell: Use your mouse to click on the cell where you wish to enter the data.
3. Start Typing into the Cell: Now, type in whatever data you want in that cell - text, numbers, or dates. As you type, you'll notice the data appearing in the cell and the formula bar at the top.
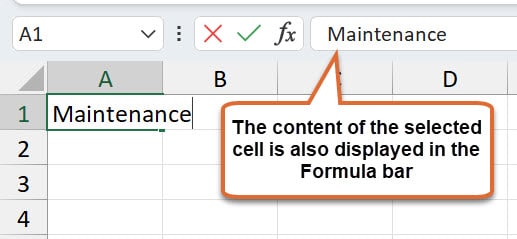
4. Move to the Next Cell: Once you've entered your data in a cell. Press ENTER if you want to move downwards to the next cell. This is super handy when you’re entering data in a column. Press TAB if you want to move to the right, perfect for filling out a row.
5. Adjust Column width for visibility: After entering your data, you may need to adjust the column width to ensure all the data is visible. To do this, hover over the column header's right edge until the cursor changes to a column-adjusting icon, then click and drag to resize.
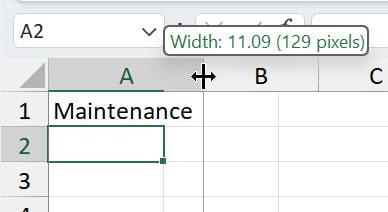
As you drag, the column width will expand, revealing more of your data. Keep dragging until all the content in your cells is fully visible and comfortably spaced. If you go too far, you can always drag back to the left to reduce the width.
6. Edit the Data If Needed: Did you make a typo? No problem. Double-click the cell, and you can edit or replace what's there. To delete the data, select the cell and then press the DELETE key.
7. Repeat the Process (if required): Continue these steps for each piece of data you want to enter. Click, type, and then use ENTER or TAB to move around.
And there you have it – the basic but mighty process of entering data into Excel. This simple method is the foundation of all Excel data management. If you're just starting out check out our post 'Data Entry in Excel: A Beginner's Step-by-Step Guide'. By mastering this, you're on your way to becoming an Excel pro!
2. Essentials on How to Enter in Excel Cell
Skill level: Beginner
Once you have a good grasp on the basics of data entry in Excel, it's time to learn more advanced techniques. One useful trick is to use ALT + ENTER to insert line breaks within a cell.
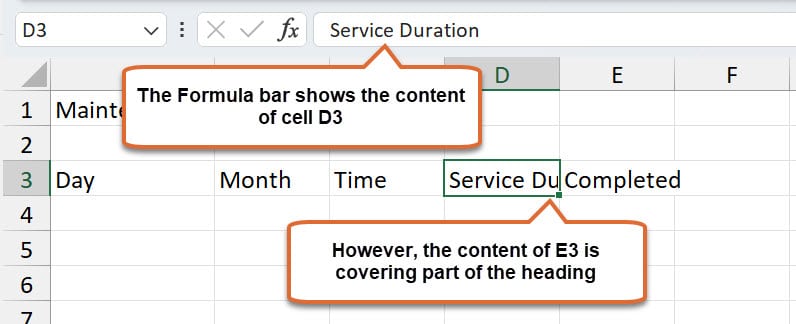
This is particularly handy when you need to format longer text in a more readable way. For example, if data obscures a column heading in an adjoining cell, you can use this trick to make the text easier to read.
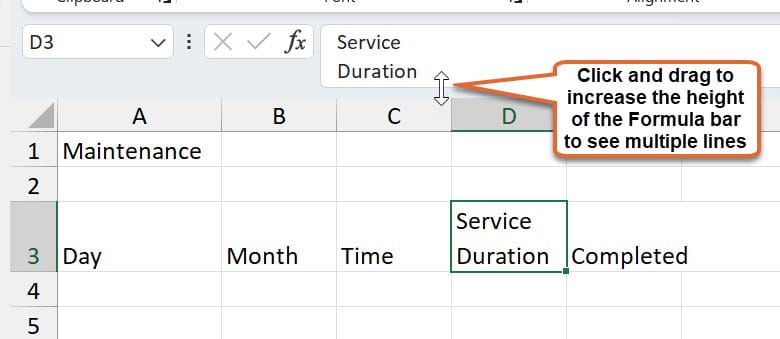
For example, in the image below, in the Formula bar you can see the content of cell D3, but the content of E3 covers part of the heading. Pressing ALT + ENTER in a cell moves hidden text to a new line for easy viewing.
1. Double-click the Cell for Multi-Line Text: Start by double-clicking on the cell where you want to enter or already have entered the text that needs line breaks.
2. Place the Cursor where you need the break: If starting with a blank cell, type the text for the first line. If the cell already has text, place the cursor exactly where you want the new line to begin using the arrow keys to navigate the text.
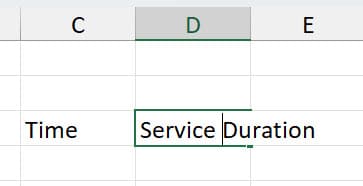
3. Insert a Line Break using Alt + Enter: Once your cursor is in the correct position, hold the ALT key (‘Option’ key on Mac) and press ENTER. You'll see that the text now drops down to a new line within the same cell.
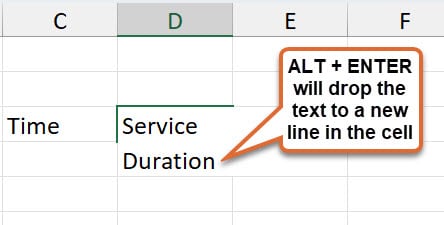
4. Enter the new line of text and Repeat if More Lines are Needed: You can repeat the ALT + ENTER combination as many times as necessary to create additional line breaks. This allows you to format the text in the cell just like you would in a word processor, but with the convenience and functionality of Excel. Once you have all lines completed, press ENTER.
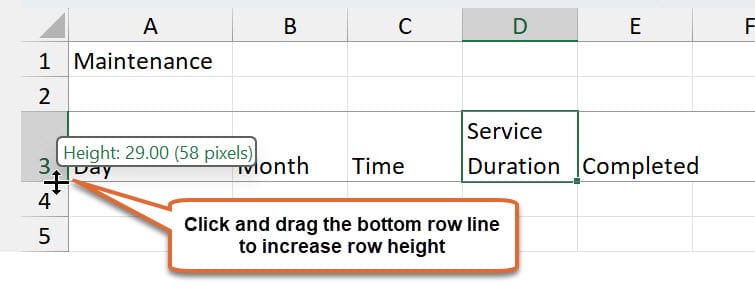
5. Adjust the Row Height for Visibility: After inserting the line breaks, you might need to adjust the row height to make all the lines visible. You can do this manually by dragging the row boundary or using the 'Format' options for more precise control.
6. Adjust the Formula Bar Height for Visibility: After inserting the line breaks, you may also need to adjust the Formula bar height to make all the lines visible.
By mastering ALT + ENTER, you can transform a cell into a mini text editor, making your spreadsheets more informative and easier to read. Check out more tips and advanced data entry techniques within a single cell in our Alt + Enter and Wrap Text post.
3. Optimising Copy and Paste in Excel
Skill Level: Beginner
Bringing external data into your Excel sheet can add a whole new dimension to your work, whether a list from a Word table or a snippet from another Excel file, incorporating this data into your spreadsheet can be done in a few simple steps.
Here's how you can seamlessly integrate external data into your Excel worksheet:
1. Locate and Select the Data: Begin by going to the source of your data, for example, another Excel spreadsheet. Carefully select the data you wish to copy. You can do this by clicking and dragging your mouse over the data, including everything you need.
2. Press Ctrl + C to Copy the Data: Once your data is selected, right-click on the highlighted area and choose 'Copy.' Alternatively, you can use a keyboard shortcut – Ctrl + C on Windows or Command + C on Mac.
3. Switch to where you’d like the data placed: Now, open or switch to the Excel workbook where you want this data to go. Navigate to the spot in your spreadsheet where you'd like the data placed.
4. Select the Starting Cell: Click on the cell where you want your copied data to begin. This is important because Excel will paste the data starting from this cell and fill it down and to the right.
5. Press Ctrl + V to Paste the Data: Right-click on the selected cell and choose 'Paste.' You can also use the keyboard shortcut – Ctrl + V on Windows or Command + V on Mac. Your external data will now appear in your Excel sheet.
6. Adjust Column Widths and Format (if required): After pasting, you may notice that some cells or columns don't display the data correctly due to width constraints. Adjust the column widths to ensure all your data is visible and neatly organised.
Voila! You've successfully integrated external data into your Excel worksheet. This method is a basic yet powerful tool in your Excel skill set, allowing you to effortlessly enter data. If you're keen to become a copy and past 'ninja', click here for more super helpful tutorials and tips!
4. Data Replication Using the Fill Handle in Excel
Skill level: Beginner
The fill handle in Excel is a powerful little tool! It's that tiny square at the bottom-right corner of a selected cell, and it's there to make your data entry faster and more efficient.
Let's walk through how you can use this feature with an example:
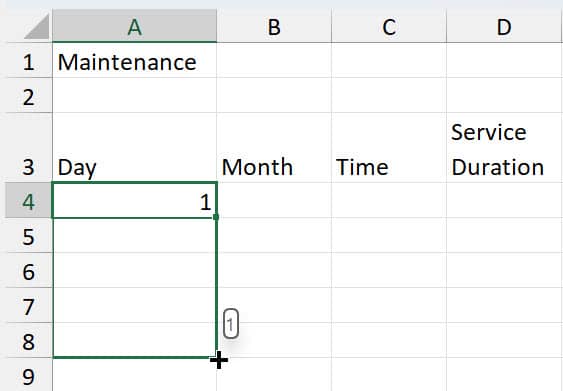
1. Start with Your Initial Data: Let’s say you have a cell, A4, with the number '1' in it. This cell is where your journey with the fill handle begins.
2. Select the Cell with the Fill Handle: Click on cell A4. Notice the small square at the bottom-right corner of the cell border –your fill handle.
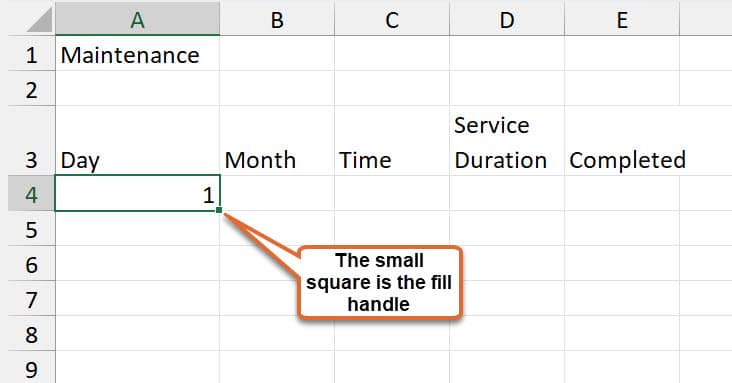
3. Drag the Fill Handle: Place the mouse pointer over the fill handle. Once the pointer is displayed as a black cross, click and drag it over adjacent cells where you want the data to be copied. For our example, drag it down to cell A8. This action tells Excel that you want to replicate the value of cell A4 in cells A5, A6, A7, and A8.
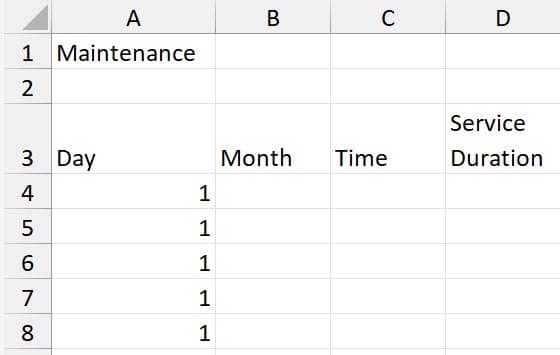
4. Release and Observe the Magic: After you release the mouse button, Excel fills the selected cells with the data. In our example, cells A4 through A8 will now all display the number '1'.
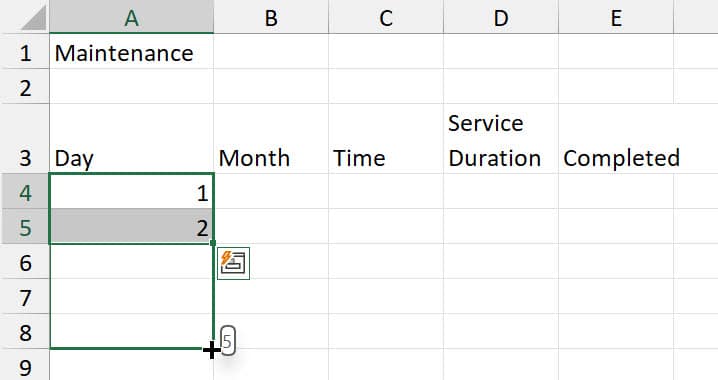
5. But Wait, There’s More: The fill handle isn’t just for duplicating data; it’s also intelligent enough to recognise patterns. For instance, if you had '1' in A4 and '2' in A5, by selecting A4 and A5 and then using the fill handle on these cells, dragging down to A8 would fill the cells with an increasing sequence of numbers – 3, 4, and 5 in A6, A7, and A8 respectively.
6. Copying Formulas: The fill handle isn’t limited to values; it also works wonders with formulas. If A1 had a formula, say '=B1+C1', dragging the fill handle down would copy the formula to the other cells, automatically adjusting the cell references based on their relative position.
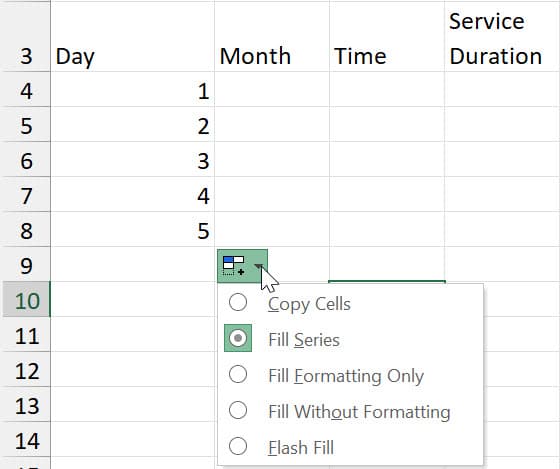
7. Customise as Needed: You can control what the fill handle does. After dragging it, a small icon appears next to the filled cells. Clicking this icon opens a menu with options like 'Copy Cells,' 'Fill Formatting Only,' or 'Fill Without Formatting,' giving you more control over the outcome.
5. Advanced Tasks with the Fill Handle in Excel
Skill Level: Intermediate to Advanced
In Excel, the fill handle is not just a tool, it's a wizard's wand for data magic. The fill handle’s more advanced features elevate data entry to an art form. Let’s explore how to use the fill handle for a series of more complex patterns:
Using the Fill Handle for Series
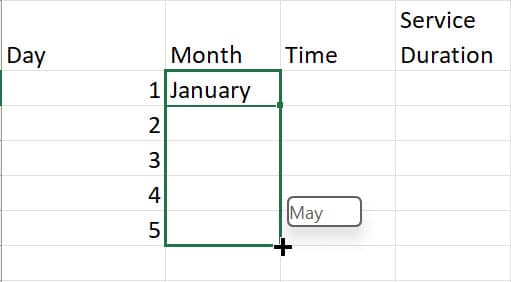
1. Start with a Pattern: Suppose you enter 'January' in cell B4. This is the beginning of a pattern you want Excel to recognise and replicate.
2. Select and Drag the Fill Handle: Click on cell B4 to select it. Drag the fill handle down or across the cells where you want the series to continue. In our example, we will drag down.
3. Observe the Series Unfold: As you drag, Excel intelligently fills in the subsequent months - 'February' in B5, 'March' in B6, and so on. This also works for days and years. Give it a try!
Using the Fill Handle for Custom Lists
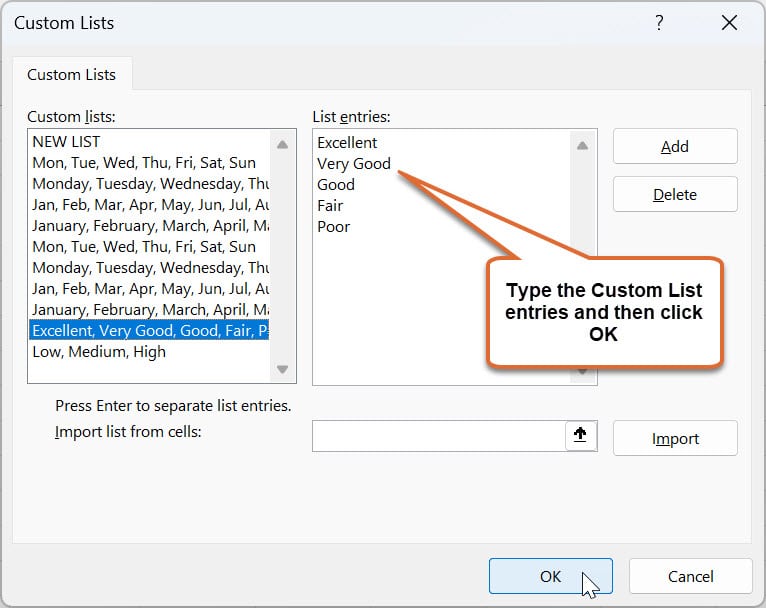
Custom lists in Excel are predefined sequences of values for efficient data entry. For example, if you create a custom list with ratings like "Excellent", "Very Good", "Good", "Fair", "Poor", Excel can automatically complete these values in your specified order. This feature saves time and ensures consistency in data handling.
1. Create a Custom List: To create a custom list, go to the ‘File’ tab, ‘Excel Options’, select ‘Advanced’, scroll down to the 'General' section, and click 'Edit Custom Lists.' Click into the ‘List entries’ box and type your custom list.
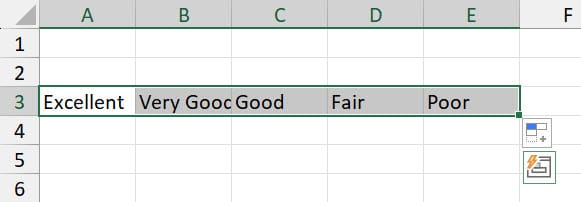
2. Insert a Custom List using the fill handle: Once you've created your custom list, you can use it in your worksheet, like any other series. Start by typing the first item of your custom list in a cell. Then, use the fill handle to drag down or across different cells.

Excel will automatically continue the sequence based on the custom list you've created, populating the cells with the next items in your list.
6. Streamlining with Flash Fill in Excel
Skill level: Intermediate
Excel's Flash Fill feature is a powerful time-saver, automating data entry tasks by recognising and replicating patterns in your data.
It's perfect for quickly formatting or rearranging data and transforming manual tasks into swift, automated processes. Let's explore how Flash Fill can effortlessly streamline your data entry in Excel.
1. Manual Input for Pattern Recognition: Let’s say you have a column of full names and want to extract the first names in a new column. Type the first name from the first cell in the adjacent column.
2. Activate Flash Fill: After typing the first example, go to the next cell in the new column. Then, go to the 'Data' tab on the Ribbon and click 'Flash Fill,' or press Ctrl + E.
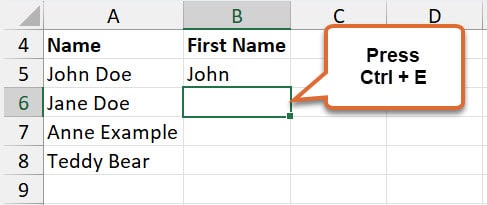
3. Watch Excel Work Its Magic: Excel recognises the pattern from your manual input and automatically fills the rest of the cells in the column with the first names extracted from the full names.
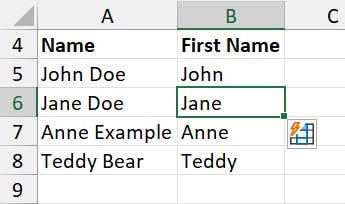
4. Fill Handle and Flash Fill: After typing the first and second example, click and drag over both and then use the fill handle to copy the content to adjacent cells. The content will be copied.
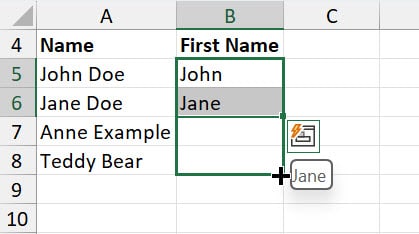
Now click Auto Fill Options and select Flash Fill.
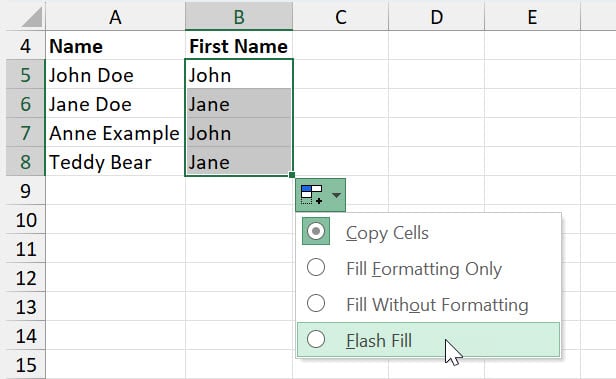
And Excel will do the rest!
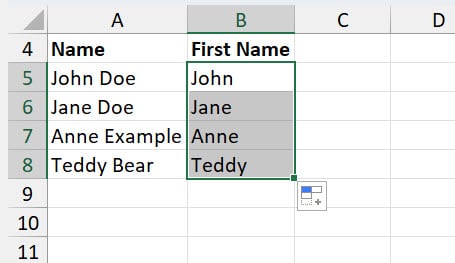
By harnessing the power of the Fill handle and Flash Fill, you transform how data is populated in your sheets. Whether extending a simple series or deciphering and applying complex data patterns, these tools make you the master of efficient and intelligent data entry.
7. Simplifying with Text to Columns in Excel
Skill Level: Intermediate to Advanced
Excel's 'Text to Columns' is a remarkably efficient tool for splitting the contents of one cell into multiple cells.
This feature is handy when dealing with data clumped together, such as full names, addresses, or any combined information, and you want to separate it for better analysis and readability.
Let’s dive into how to use this feature with a practical example:
1. Prepare Your Data: Imagine you have a list of place names in a single column, formatted as ‘City, Country’. For instance, cell A1 contains 'Syndey, Australia.
2. Select the Cell(s): Click on the cell, or if you have a series of similar data, drag your mouse to select the entire range where you want to apply this feature.
3. Access Text to Columns: Go to the 'Data' tab on the ribbon at the top of Excel. In the 'Data Tools' group, click 'Text to Columns'. This opens the 'Convert Text to Columns Wizard'.
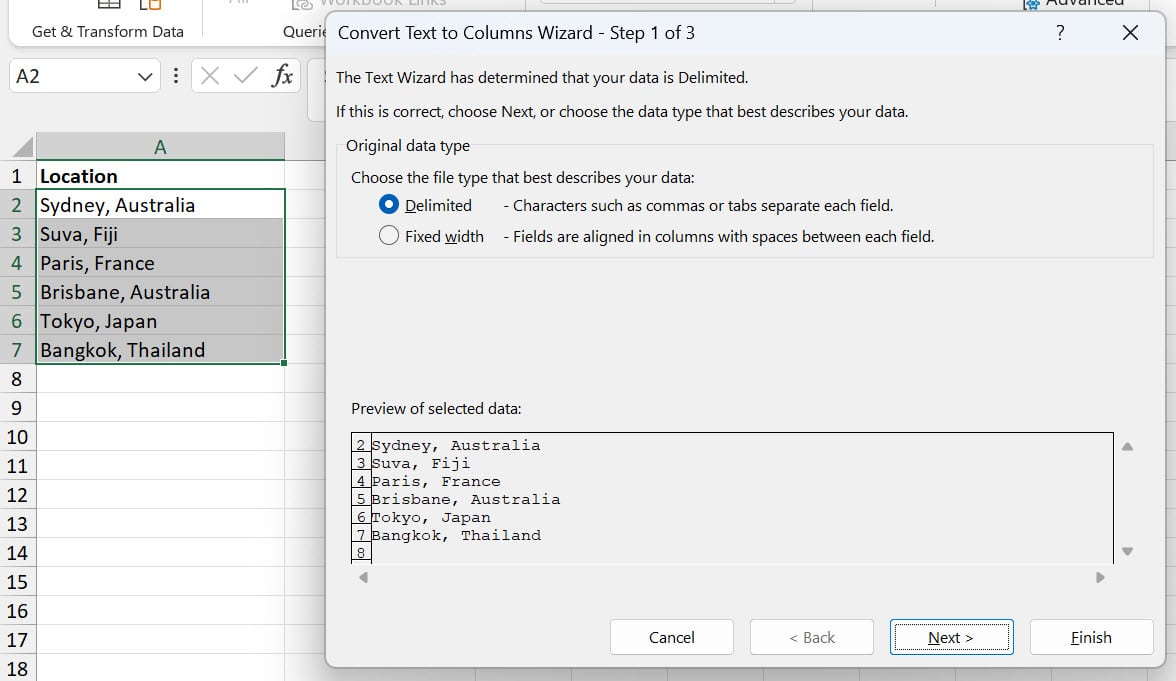
4. Choose the File Type: In the wizard, you’ll first choose the data type. For our example, select 'Delimited' –a specific character, such as a comma or a space, separates your data.
5. Set Delimiters: Click 'Next', and then choose the delimiter that matches your data. In the case of 'Sydney, Australia', you would select 'Comma'. If your data is separated by spaces, tabs, or other characters, you’d select those instead. Click ‘Next’.
6. Preview and Adjust: The wizard will preview how your data will appear. If it looks correct, proceed. If not, go back and adjust the delimiters.
7. Finish and Review: Click 'Finish', and your data will be split into separate columns. 'Sydney’ will be in one column, and 'Australia' in the next.
8. Remove unnecessary spaces: After splitting, ensure unnecessary spaces from the split data. A good understanding of the TRIM function is super helpful here.
This technique is particularly handy for cleaning and organising data in a less-than-ideal format. With 'Text to Columns', you turn a messy, congested cell into neatly organised, individual pieces of data, ready for analysis or reporting
8. Quick Data Entry Utilising Tables in Excel
Skill level: Intermediate to Advanced
Excel tables revolutionise data entry by offering a structured, efficient approach to managing information.
They simplify the process with features like automatic formula extension and easy filtering, transforming your data into a dynamic and organised system.
This streamlined functionality not only enhances the clarity of your data but also boosts your productivity in Excel.
1. Prepare Your Data: Let's say you have a list of monthly expenses. You have columns for 'Category', 'Description', and 'Amount'. This data is in cells A1 to C15.
2. Select Your Data Range: Click and drag to select the cells that contain your data, A1 through C15 in this case. Make sure to include the headers (the names of your columns) in your selection.
3. Convert to Table: With your data selected, press Ctrl + T. This is the shortcut to convert your range into a table. Alternatively, you can go to the 'Insert' tab and click 'Table'.
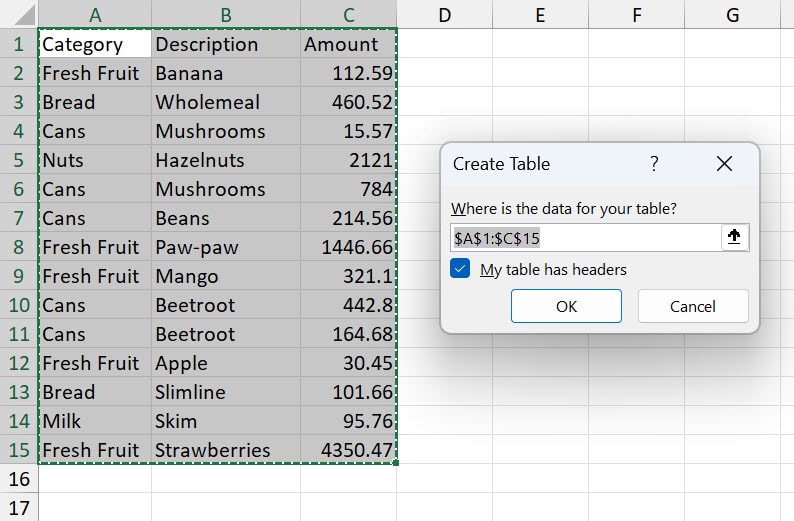
4. Confirm Your Table Range: Excel will display a dialogue box asking if your table has headers (which our example does). Confirm the range and ensure the 'My table has headers' checkbox is ticked. Click 'OK'.
5. Welcome to Your New Table: Your data range is now formatted as a table. You'll notice the colour scheme changes and filter dropdowns appear at the top of each column.
6. Auto Calculations in Tables: Here’s where the magic happens. Say you want to add a new column for 'Tax' calculations to your table. After typing 'Tax' in cell D1 (the next column's header), you can enter a formula in D2 (for example, '=C2*0.1' for 10% tax on the amount).
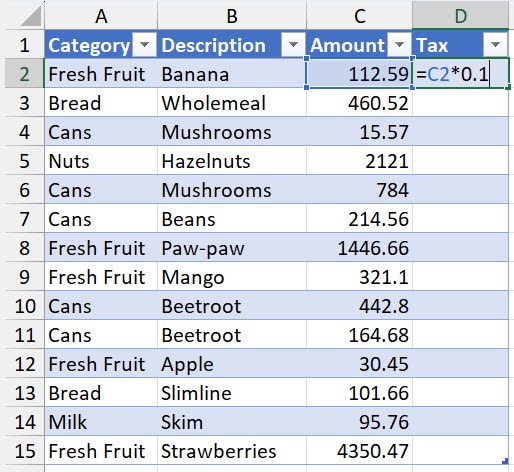
When you press 'Enter', this formula automatically applies to all existing rows in the 'Tax' column.
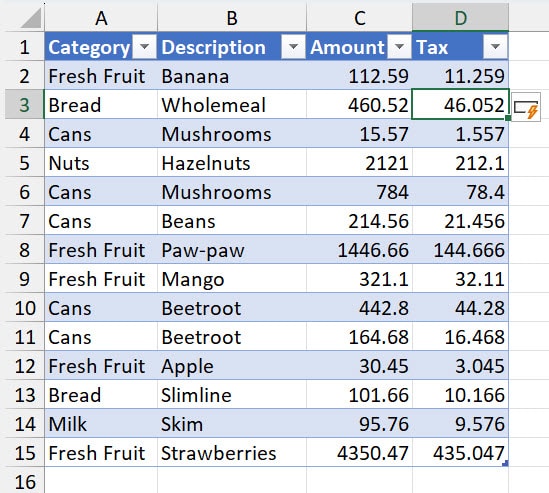
7. Expanding Your Table: As you add more data at the bottom of the table, Excel automatically extends the table range. Moreover, it also applies any formulas from the adjacent rows, saving you from manual copying.
8. Organise and Analyse: With your data in a table, you can easily sort and filter using the dropdowns in the headers. Excel tables also work seamlessly with features like PivotTables, providing a robust foundation for analysis.
Converting your data into a table in Excel streamlines data entry, making management and analysis more efficient. Tables enhance your data’s visual appeal and functionality, creating a more organised and productive Excel experience.
9. Time-Saving Excel Keyboard Shortcuts
Skill Level: Beginner to Advanced
In the fast-paced world of data management, mastering keyboard shortcuts in Excel is like having a superpower.
These shortcuts not only save you time but also increase your efficiency, allowing you to navigate and manipulate data with speed and precision.
Let's dive into some essential shortcuts and see how they can transform your data entry process:
1. Fill Down (Ctrl + D): This shortcut is a lifesaver when you need to copy the content of the topmost cell in a selected range down to the other cells in the range. For instance, if you have a formula in cell A1 and you want to apply it to cells A2 through A5, select cells A1 through A5 and press Ctrl + D. The formula is instantly copied down to all selected cells.
2. Fill Right (Ctrl + R): Similar to Fill Down, Fill Right copies the content of the leftmost cell in a selected range to the other cells in the range to the right. If you have data in cell A1 and want the same data in cells B1 through E1, select these cells and press Ctrl + R to replicate the data across the row.
3. Select All (Ctrl + A): Use this shortcut to quickly choose all the data in your worksheet. If you select a cell within a table and press Ctrl + A, it selects the entire table. If you press Ctrl + A while not in a table, it selects the whole worksheet. This is very handy for applying a format or a change to everything at once..
4. Copy (Ctrl + C) and Paste (Ctrl + V): These classic shortcuts are fundamental for any data entry task. Copy a selected cell or range with Ctrl + C, then paste it to a new location with Ctrl + V.
5. Undo (Ctrl + Z) and Redo (Ctrl + Y): Made a mistake? Instantly undo it with Ctrl + Z. If you change your mind, redo your action with Ctrl + Y.
6. Insert a New Row (Ctrl + Shift + "+"): Quickly insert a new row above your current position with this shortcut. It’s handy when you need to add data between existing rows.
7. Delete a Row (Ctrl + "-"): Similarly, if you need to remove a row, use this shortcut to delete it swiftly.
8. Find and Replace (Ctrl + F): Need to locate a specific piece of data or replace a term? Ctrl + F opens the Find and Replace dialog, making it easy to search through your spreadsheet.
9. Jump to the Start or End (Ctrl + Arrow Key): Quickly navigate to the edge of your data set by using Ctrl with an arrow key. Ctrl + Down Arrow takes you to the bottom of your current data range, for example.
By integrating these keyboard shortcuts into your routine, you’ll find that your data entry becomes quicker, smoother, and more efficient. They are especially useful for large datasets, where time savings can add up significantly.
To download a full list of Excel shortcuts visit our blog 'Best Keyboard Shortcuts'.
10. Powerful Data Entry with Excel Functions and Formulas
Skill Level: Intermediate to Advanced
In the advanced realm of Excel, leveraging specific functions can immensely enhance your data entry and linking capabilities.
Functions like VSTACK, VLOOKUP, HLOOKUP, INDEX, and MATCH are not just tools; they are powerful allies in managing complex datasets. Here's how these functions can elevate your data entry process:
1. VSTACK Function: Ideal for vertically stacking arrays or ranges, the VSTACK function can combine multiple ranges into one continuous vertical range. This is particularly useful when consolidating data from different sources or sheets into a single column. For example, =VSTACK(range1, range2) would stack the data from 'range1' and 'range2' vertically.
2. VLOOKUP and HLOOKUP Functions: VLOOKUP, short for Vertical Lookup, is a function used to search for a value in the first column of a table array and return a corresponding value from the same row in a specified column. It's extremely useful for data entry and retrieving information from different tables based on a key value.
Similarly, HLOOKUP, or Horizontal Lookup, functions in the same way but searches for a value in the top row of a table and returns a value in the same column from a specified row. This is especially helpful for dealing with data organized horizontally.
While the XLOOKUP function has been introduced to replace both VLOOKUP and HLOOKUP, offering more flexibility and ease of use, it's important to note that many existing spreadsheets still utilize VLOOKUP and HLOOKUP.
As such, understanding how these older functions work remains essential for effectively navigating and managing various types of data spreadsheets.
3. XLOOKUP Function: The XLOOKUP function is a versatile tool that replaces both VLOOKUP and HLOOKUP. It searches for a value within a specified array or range and returns a corresponding value from another array or range. Unlike HLOOKUP, which only looks in the top row, XLOOKUP can search in any direction. For example, =XLOOKUP(lookup_value, lookup_array, return_array, [if_not_found], [match_mode], [search_mode]) lets you find specific data more flexibly, either from rows or columns, based on your specified criteria.
4. INDEX and MATCH Functions: When combined, INDEX and MATCH are a powerful duo for dynamic data retrieval. INDEX returns the value of a cell in a table based on the column and row number. MATCH finds the position of a value in a row, column, or table. Together, they can look up values vertically and horizontally without the limitations of VLOOKUP or HLOOKUP. For example, =INDEX(array, MATCH(lookup_value, lookup_array, [match_type])) allows you to retrieve a value from any position in a table.
5. CONCAT (or CONCATENATE in older versions of Excel): This function combines text from different cells into one cell. For instance, if you have first names in one column and last names in another, you can use CONCAT to combine them into full names in a new column. It simplifies the process of merging data from multiple cells. The syntax is =CONCAT(text1, [text2],...) or =CONCATENATE(text1, [text2],...).
The functions mentioned above are just a few examples of the tools available in Excel to enhance data entry and analysis. However, it's important to note that Excel offers various other functions, each with its unique capabilities. Functions like FILTER, UNIQUE, and SORTBY, for instance, are incredibly powerful for advanced data management.
Bonus Technique: Data Validation Drop-Down List in Excel
Skill Level: Intermediate to Advanced
In addition to the essential techniques we've explored, another powerful tool in Excel's arsenal that deserves special mention is Data Validation Drop-Down Lists.
This feature not only enhances the accuracy of data entry but also makes the process more user-friendly and efficient.
What are drop-down lists?
Data Validation Drop-Down Lists in Excel are a fantastic way to control and limit the type of data entered into your spreadsheet.
By creating a drop-down list, you can provide a predefined list of options for users to choose from, thereby reducing entry errors and ensuring consistency in data collection.
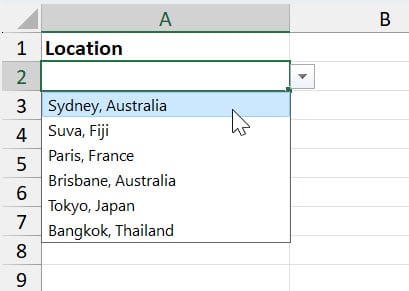
This is particularly useful in scenarios where input needs to be standardised, such as in forms, surveys, or financial models.
The drop-down list can be populated with items like product names, locations, or values you wish to define.
Interested in adding this functionality to your Excel toolkit? Dive deeper into how you can create and customise these drop-down lists to suit your specific data entry needs. Check out our detailed blog on 'How to Create Drop-Down Lists in Excel' for step-by-step instructions and tips to master this valuable feature.
Conclusion: Enter Data in Excel
In conclusion, our exploration of '10 Essential Techniques on How to Enter Data in Excel' has taken us from the straightforward basics of manual entry and copy-paste to the more advanced realms of using functions like XLOOKUP and CONCAT and the dynamic capabilities of Excel tables.
Each technique, tailored for beginners and advanced users, not only enhances data entry efficiency but also unlocks the vast potential of Excel for organising, analysing, and transforming data.
This guide aims to empower you, the reader, with the tools and knowledge to harness Excel's full potential, elevating your data entry skills to new heights.
Was this blog helpful? I'm here to empower your journey with Excel, aiming to make your daily tasks more efficient and boost your potential.
Share your thoughts in the Comments below - your insights not only enrich others, they also help me tailor future content to your needs.
And if you're looking to take a step further, join our exclusive 'Insider Group'. As a member, you'll get early access to our latest tips, and in-depth tutorials. Sign up Today!"
Happy Excel-ling!!


