If you want to save yourself a huge amount of time when reconciling data, learn how to use VLOOKUP to compare two columns in Excel.
Years ago the Training and Development manager of a large organisation invited me to spend some time in their Accounts department in order to observe how the Accounts team dealt with their day-to-day tasks. My job was to report on any process that could be improved using Microsoft® Excel.
I’ll always remember asking one of the team (a “just-out-of-school” new recruit) what he was working on after I’d observed him sitting with a red biro and a ruler, diligently drawing red lines on 2 separate sheets of paper. It turned out he was trying to reconcile a customer’s account.
The customer had sent him a list of the invoices and amounts they had on record as being paid.
The young administrator had printed a list of all of the customer’s invoices and payments that his company had on file. He then proceeded to use his red biro to place a line through any invoice where the details matched on both sheets. He explained to me that once he completed this job he would then have eliminated the payments where both sheets matched and he would then only deal with the invoices that didn’t match.
This way of reconciling a customer’s account was taking hours, and in some cases days to complete.
I couldn’t wait to show this young guy how to use the VLOOKUP function. The steps below cover how I explained to him (and others in his department) the best way to compare two columns in Excel using the VLOOKUP function.
Click here to Download the example workbooks and follow along with the instruction. We'll also give you a 'completed' copy of the workbook so that you can check your formulas against the completed copy.
Compare two columns in Excel using VLOOKUP
Step 1: There are a few rules so we checked these first
The customer had sent a very basic Excel worksheet that showed a list of their payment records by purchase order, invoice number, amount and date.
The administrator (let’s call him Guy) then generated an Excel report out of his company’s accounts system. We then proceeded to use both Excel worksheets to do our reconciliation.
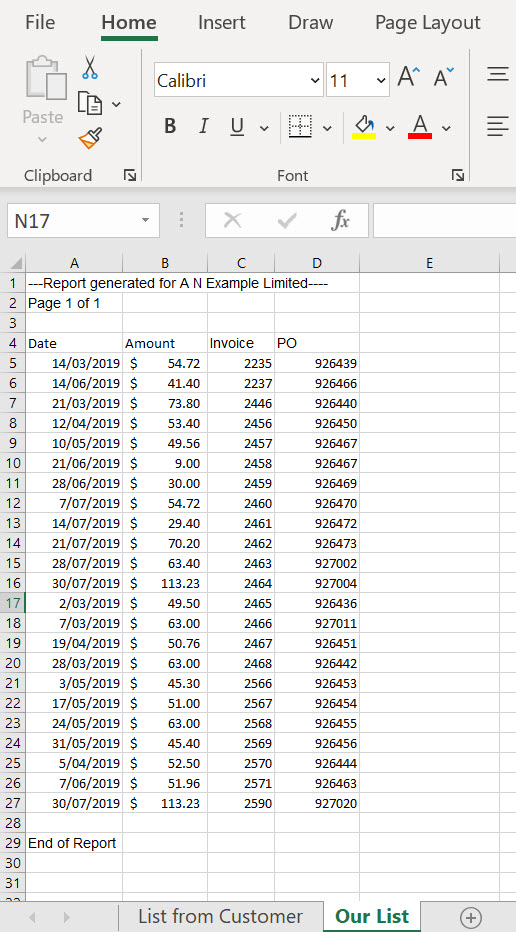
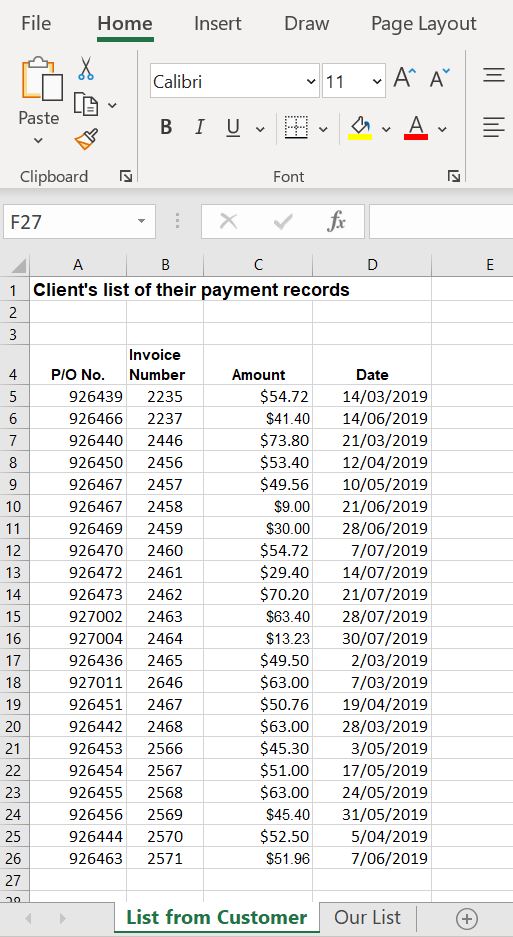
However, before we could start using the VLOOKUP function I explained the intricacies of getting your data into a format that will ensure the VLOOKUP works.
Excel needed the following:
- Within the customer’s workbook and Guy’s workbook there needed to be at least one matching piece of information for each record. For example, both workbooks had the invoice number and the purchase order number for each transaction record. We decided to use the invoice number in Guy’s workbook to locate a match for the same invoice number in the customer’s workbook. This piece of information is called the ‘Lookup Value’.
- The Lookup Value must be unique, i.e. it can’t be repeated in the customer’s list multiple times. Fortunately for Guy there was only one record for each invoice. In business invoice and PO numbers are almost always unique to a single transaction so they are excellent to use as Lookup Values. Other examples are product codes, client or account numbers, employee numbers or department codes. It is always good practice to check there are no duplicates prior to performing your VLOOKUP.
- The Lookup Value needed to be located in the first column of the list in the customer’s workbook. Unfortunately it wasn’t. It was located in the 2nd column (column B) so we cut and pasted the column in front of the P/O No. column. This is an important rule when using the VLOOKUP function. If the Lookup Value isn’t in the first column the lookup won’t work.
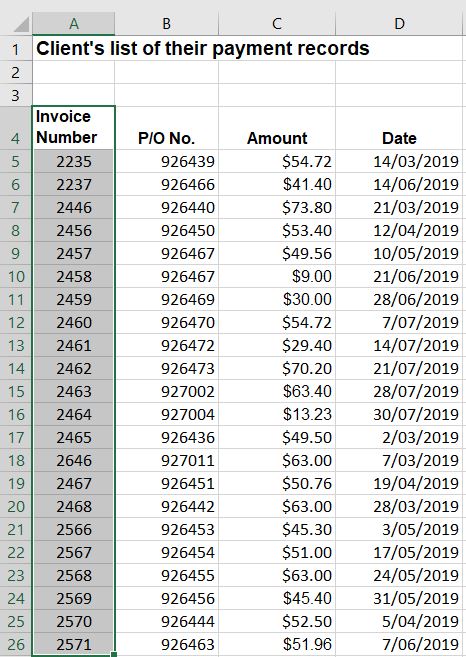
Once we had decided on our Lookup Value and reorganised the list in the customer’s workbook we were ready to create our VLOOKUP.
Step 2: Inserting the VLOOKUP function
The ‘V’ in VLOOKUP stands for “vertical”. A vertical lookup is used to look for specific data in the first column of a data table. Once it finds the row that holds the data you are looking for it then bounces across to another column in the same table of data and returns information from it.
We decided to insert the VLOOKUP function in Guy’s workbook. That way we could use the function to reference the invoice number from his list and check for the same invoice number in the first column of the customer’s list. If it found a match it would then return into the cell the amount that the customer had against the invoice number. We would then end up with Guy’s amount and the customer’s amount in the same worksheet. We could then easily compare the two and work out which transactions didn’t match.
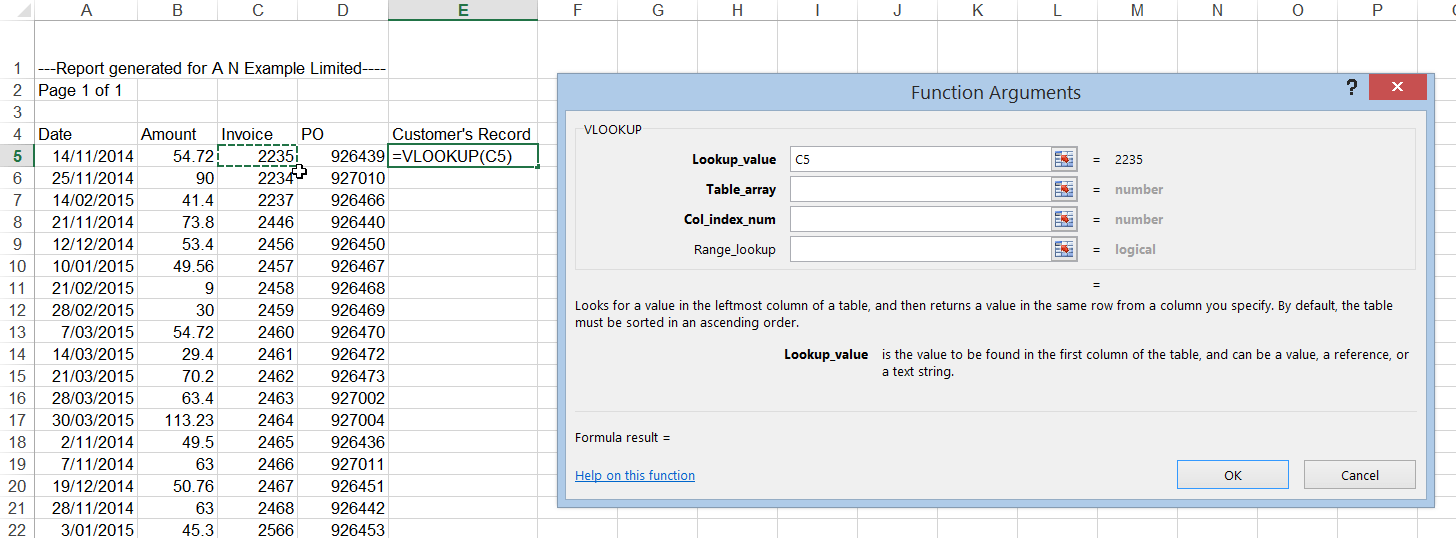
We created a new column heading called ‘Customer’s Record’, placing it at the end of Guy’s existing list. Placing the cell selector on cell E5 we inserted the VLOOKUP function.
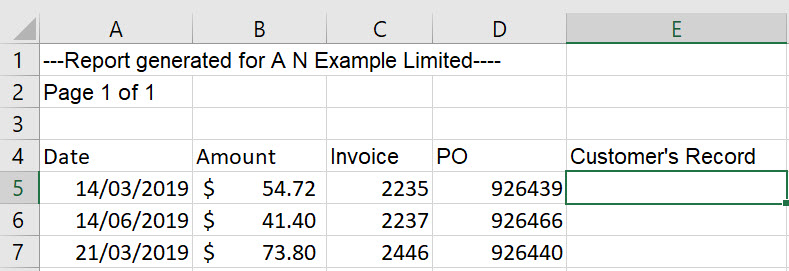
To insert the function we clicked the Formulas tab and then from the Function Library group clicked the Insert Function button.

Tip: the VLOOKUP function can also be inserted by clicking the Insert Function button on the Formula Bar.

From the select a category box we selected Lookup and Reference. From the Select a function list box we selected VLOOKUP and then clicked OK.
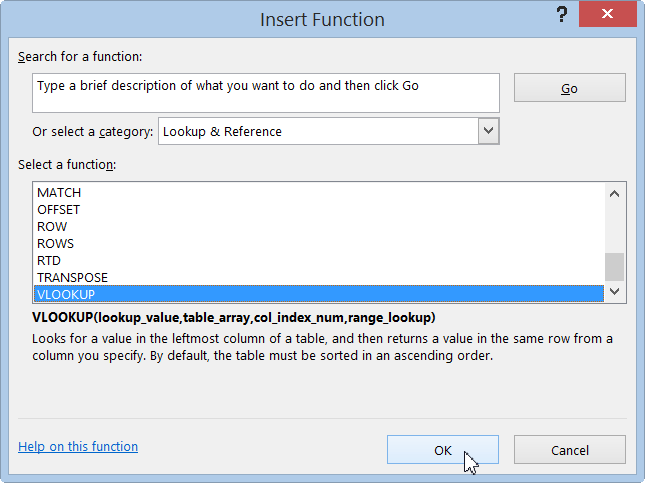
At this point we needed to enter the appropriate values into the Function Arguments boxes. I’ll step you through each of the arguments.
- Lookup_value – This was the invoice number held in cell C5. Once we entered this into the Lookup Value box Excel held it in memory and waited for us to complete the remaining arguments.
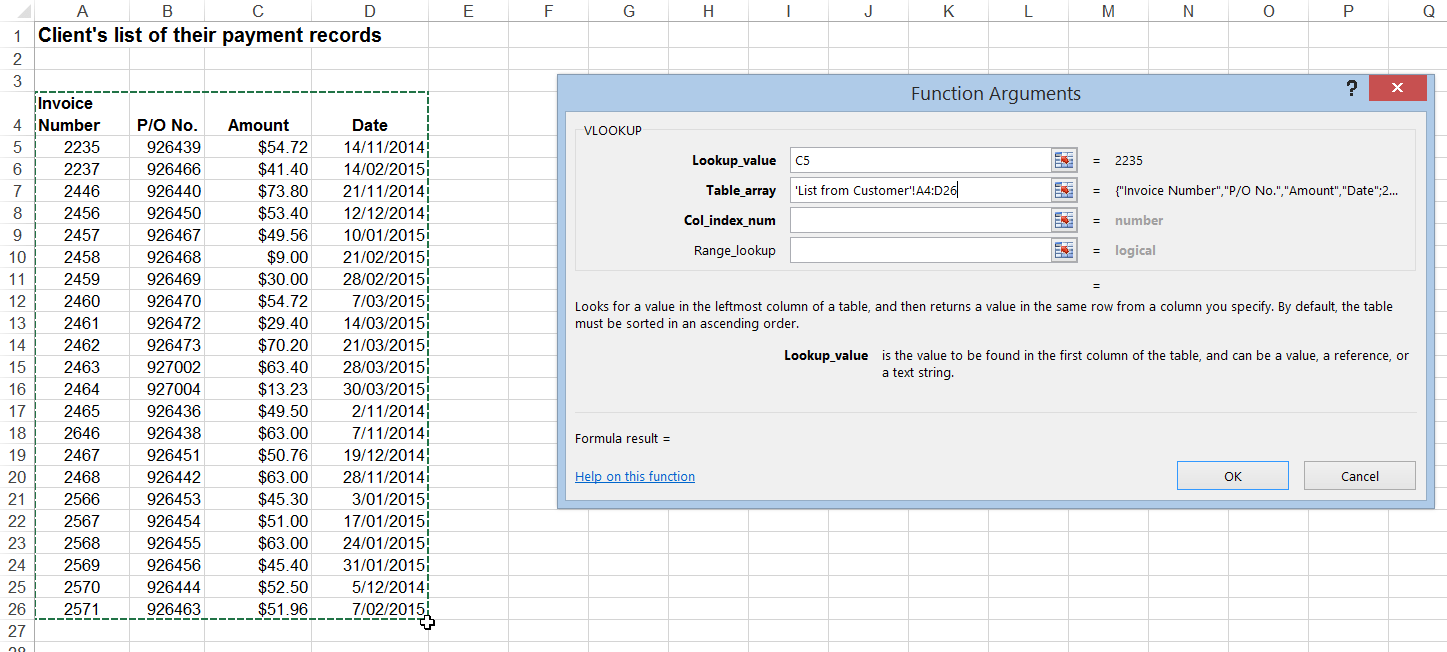
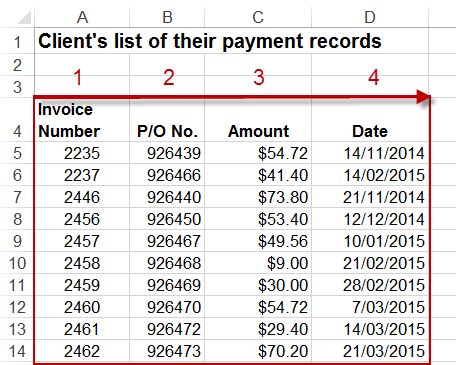
- Col_index_num - This is the column from which Guy wanted to pull through the customer’s invoice amount. This was column 3 in the customer’s transaction list. Columns are numbered from left to right with the first column in the table array range being column 1. Be careful not to get column numbers and column letters mixed up. Even though the invoice amount is held in column ‘C’ Excel only wants the index number location of the column, not the column letter.
- Range_lookup - The Range Lookup controls whether you are searching for an exact match to your ‘Lookup Value’. I explained to Guy that if he entered TRUE or left the box empty Excel would search for his invoice number but if it couldn’t find a match it would return the next largest value that is less than the invoice number. For example if it couldn’t find invoice 2466 it would find the record for 2465 and return the amount for that instead. For this to work the customer’s list needed to be sorted by invoice number first. However, if ‘FALSE’ is entered into the box Excel will search for an exact match for the Lookup value. Guy wanted an exact match for his invoice number so he entered FALSE into the box. I also passed on the tip that you can enter 0 (zero) in place of the word ‘FALSE’ and Excel will do the same thing.
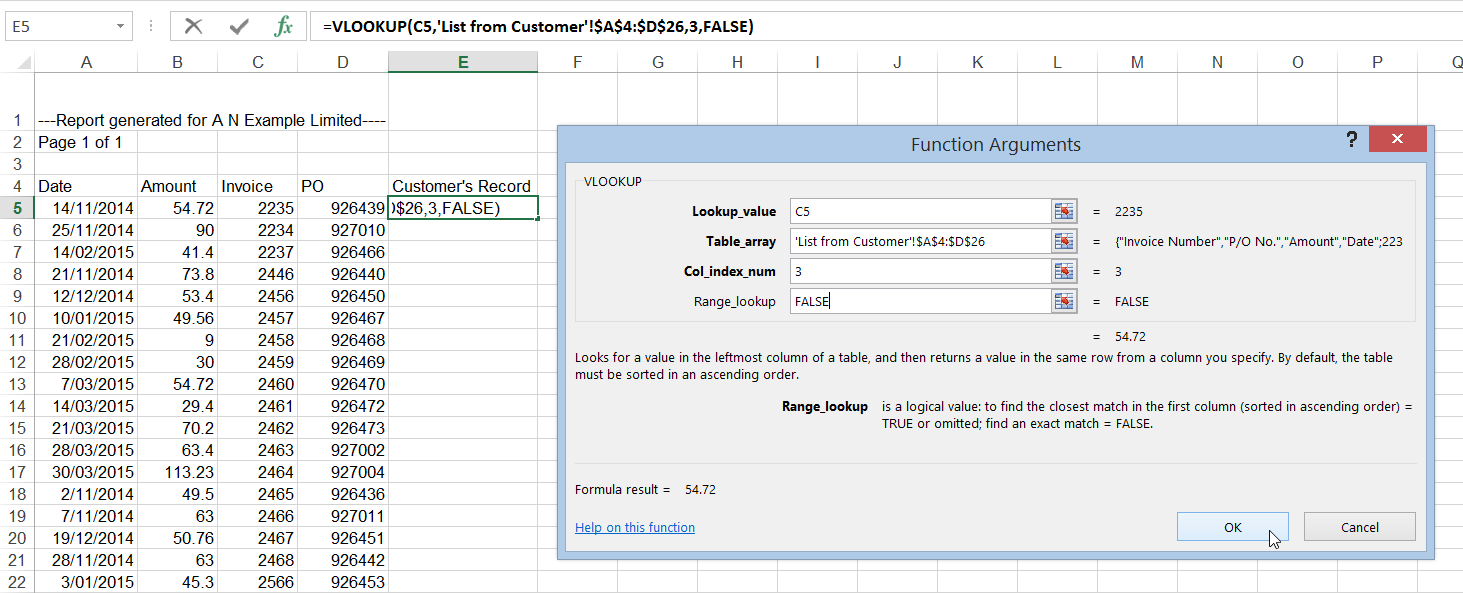
With all of the arguments entered Guy clicked OK.
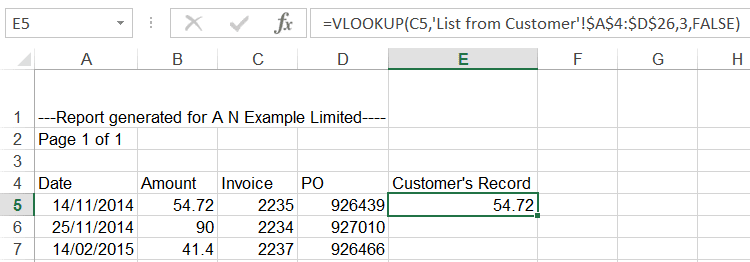
Excel then stepped through each of the values supplied in the argument box. The function used the invoice number (Lookup Value) to look for a matching invoice number in the left-most column of the customer’s records (Table array). Once the invoice number was found it then jumped across the specified number of columns (column index number) on the same row to return the invoice amount.
Thankfully, as you can see below, the customer had the same invoice value as Guy.
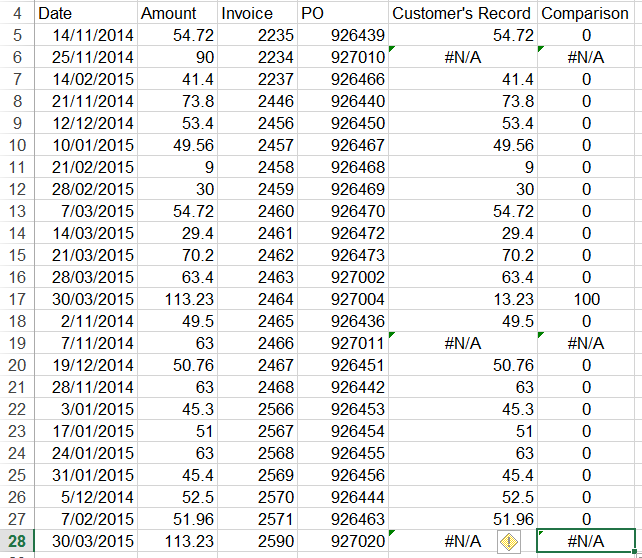
Guy then copied the VLOOKUP function for all of the invoice transactions.
Within seconds he could see three #N/A errors (value not available errors). This showed where the customer didn’t actually have a record of these invoices. He then quickly found the differences in his and the customer’s invoice amounts. Immediately he could see that invoice 2464 was short $100.00, most probably a keying error.
Step 3: the double-check
We had now successfully compared our records to the customer’s. However, as a double check we then decided to do a comparison from the customer’s records, just in case we had missed something.
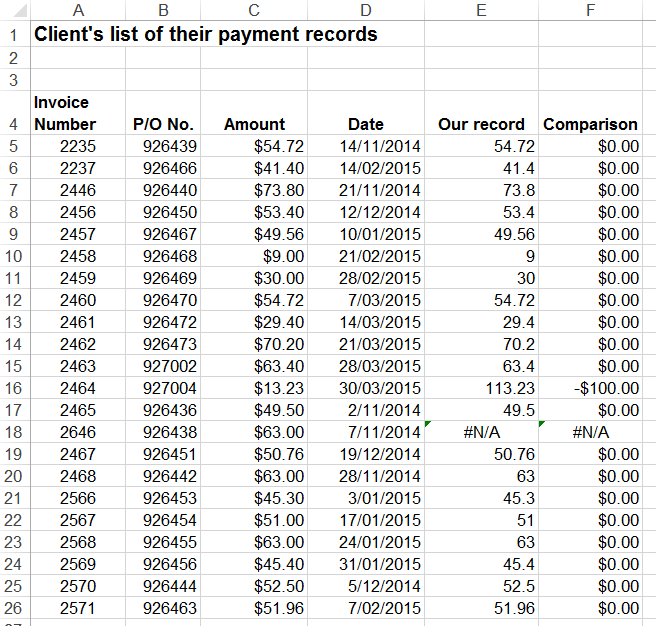
This time we created the VLOOKUP in the customer’s worksheet. The first thing we needed to do was move the invoice column so that it was the first column in our transaction list (Table Array). After doing this we then inserted the VLOOKUP function into a new column called 'Our record'.
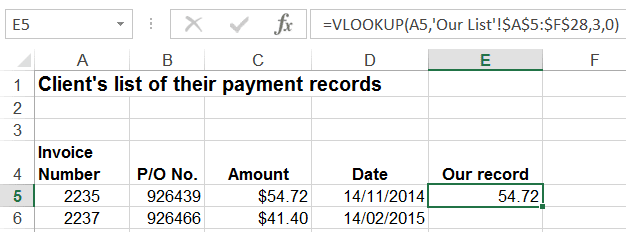
Guy copied the function down and then created the ‘Comparison’ column. Our double check confirmed that the customer had under paid us $100 on invoice 2464. Our check also showed that the customer had quite possible recorded the invoice number for invoice 2466 as 2646.
Conclusion
Guy could now go back to the customer to discuss the information that may have been keyed in error and to supply copies of the invoices that the customer didn't have a record of receiving.
Needless to say, the VLOOKUP function saved Guy, and his work mates, a huge amount of time. The Training and Development manager contacted me after the training to say that the improved efficiency in the department had saved their company 10s of 1000s of dollars.
We cover the VLOOKUP function in our Excel Stage 3 courses. If you are dealing with large data this training is definitely for you.
Was this blog helpful? Let us know in the Comments below.


Your tutorial was a life saver and very helpful. Thank you!
Hi Nicole. I’m so happy it was helpful to you. Thank you so much for letting me know ??
This was super perfect for me, i was battling with this function for hours before i finally saw this, and i was able to get it immediately
Thank you so much
Fantastic! I’m so glad it helped you. Thank you so much for letting me know 🙂