Need to learn how to quickly remove spaces in Excel?
Extra spaces can appear in your worksheet for lots of different reasons such as someone accidentally typing them in or extra characters traveling with data exported out of another software product.
In this Blog we will cover two different options to remove those extra spaces, as well as how extra spaces can impact Excel calculations such as VLOOKUP.
Remove spaces in Excel using Find and Replace
Find and Replace can be used to remove extra spaces.
Let’s have a look at an example in Excel. Column A has several cells where extra spaces need to be removed.

First, select the cells that contain the extra spaces you want to remove.

To do a Find and Replace press Ctrl + H. This will open the Find and Replace dialog box.
Click into the Find what box and then press your Spacebar once to add a space into the text box.

Replace it with nothing by leaving the Replace with text box empty and then select Replace All.


Excel will then send you a notification saying how many replacements have been made. Click OK.

You will see that this has fixed a few cells with spaces but sometimes you don’t get exactly what you needed. For example, Sarah Brooke and Robert Brown have lost the space between their names making their first and last names one word.

Remove spaces using the TRIM function in Excel
Instead of deleting extra spaces one by one, or using Find and Replace and not getting the outcome you want, the TRIM function can be used. TRIM saves time as well as avoids the issue of losing the spacing between text.
The TRIM function looks at the information on your worksheet and checks to see if there are extra spaces before, in-between and after the data and removes these.
If spaces are found in-between the data, TRIM removes all but one space to ensure the words aren’t run together.
Let’s look at another example in Excel. Below we have an example of several cells that contain spaces before, between and after text.

To remove the spaces from the cell containing Sarah Brooke (A4), click into another cell (for this example cell B4 was used) and type the following formula. Typing the formula in uppercase or lowercase characters is fine.
=TRIM(

Click onto the cell that you want the spaces removed from (in this example A4).

Type a close bracket to give you the formula =TRIM(A4).

Press ENTER. You should now have a cleaned version of the data in cell B4.

How extra spaces can affect formulas
One thing to look out for are extra spaces in cells referenced within formulas.
Let’s look at an example using a VLOOKUP formula.
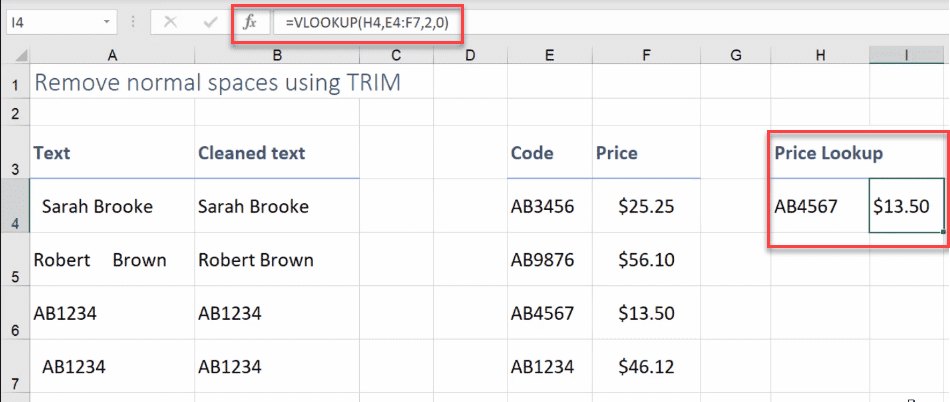
In the example below, cell I4 is using a VLOOKUP formula to look up the price of an item, based on the code entered into cell H4.
The VLOOKUP is looking down the list of codes in column E to find a matching code. It then returns the corresponding price from the same row. For example, entering AB4567 into cell H4 as the lookup value, Excel will return the cost price of $13.50 from cell F6 into cell I4.
Tip: for step-by-step instruction on how to create a VLOOKUP between two columns please check out my blog Excel – Using VLOOKUP to compare two lists.

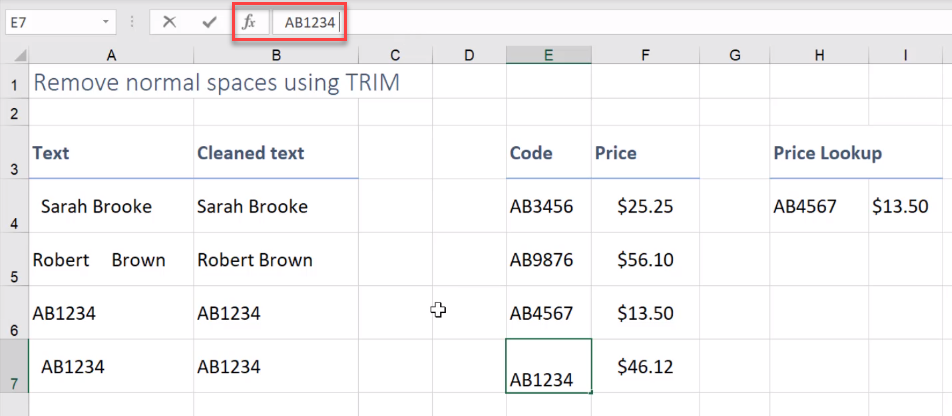
Cell E7 has an extra space at the end of the data which can be seen in the Formula Bar in the image below.

If you were to do a VLOOKUP on the code AB1234 by entering the code, without the extra space, into cell H4, Excel will return the #N/A error into cell I4.

This is because the code you typed into cell H4 does not match the code in E7 as it does not have a space at the end of it.
If the codes don’t exactly match, VLOOKUP will not be able to find it in the Code column and therefore won’t be able to return the corresponding price.
The best thing to do in this situation is to use the TRIM function to remove the extra space (or spaces).
To do this, insert a temporary cleaning column into your worksheet. You can easily delete this later if you have to. For this example, column D will be used as the cleaning column.

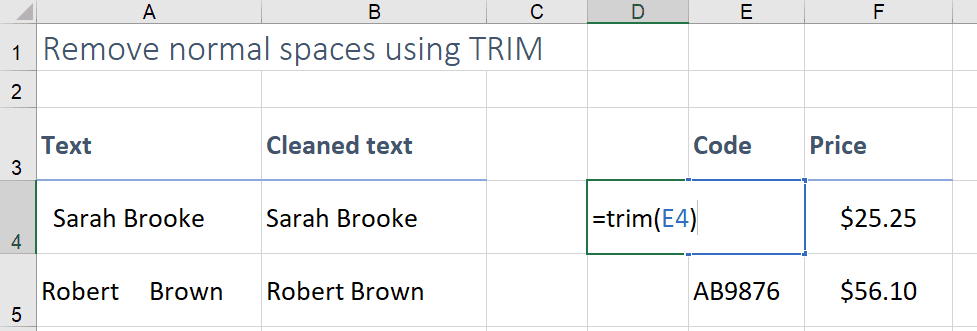
Type =TRIM into the cell next to the cell with the data you want to clean (for this example its cell D4).
Then click on the cell you want to clean (E4) and then type a closed bracket. This will give you the formula =TRIM(E4). Press Enter.

Return to the cell that now contains the TRIM function (D4).
If you need to, copy the formula. In this example we will copy it into cells D5 to D7.
The data will now be free from extra spaces.
However, the cleaned data is a formula that is referencing the data that holds the extra spaces.
If we now delete the original data held in column E our formula will no longer work.
Remove the formula but keep the value
If you would like to now replace the old data with the cleaned data you might like to Copy and then use Paste Values to paste the cleaned data over the original.
To do this select all cells that contain the formula. In this example we will select cells D4 to D7.

Press Ctrl + C to do a copy.
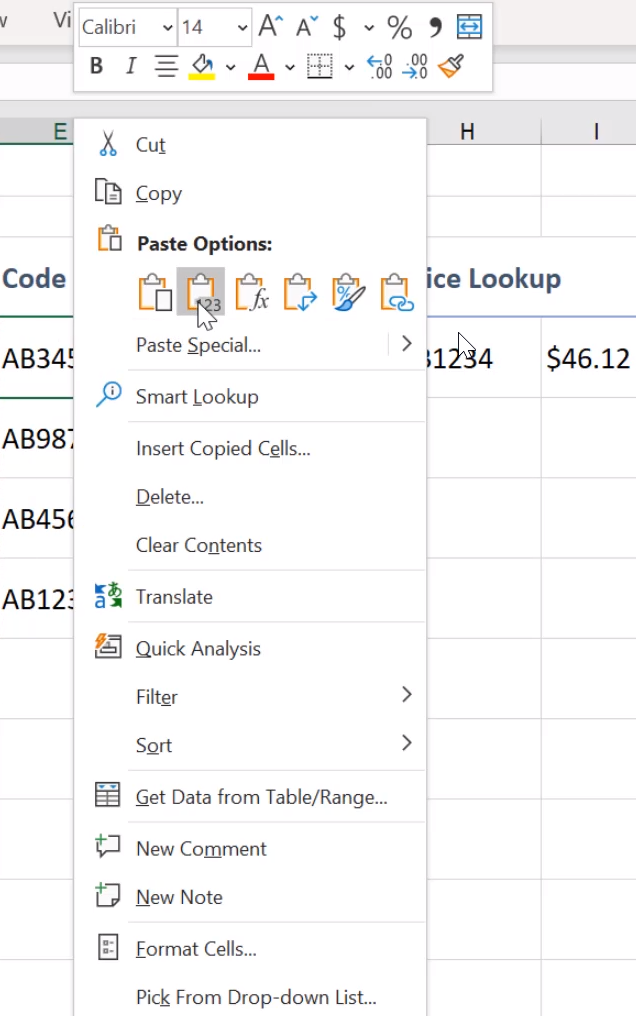
Now paste the copied data over the original data, but use Paste Values instead of doing a normal Paste.
To do this, right click and select Paste Values (the clipboard with 123 on it) to paste the values into column E.

You should now have your cleaned data in column E.

And you can now Delete the formulas held in the cleaning column (column D).

But the best part is your VLOOKUP will now work as it should!
Was this Blog helpful? Let us know in the Comments below.
If you enjoyed this post check out the related posts below.

