Page numbers in Word can be quite tricky at times, and I often hear from my students about the frustration this can cause when documents aren’t working as they should. Page numbers jump around, start on the wrong page, or refuse to restart at page 1. What should be a simple task turns into a time‑waster that leaves people feeling annoyed and second‑guessing themselves.
In most cases, the problem isn’t you — it’s that Word hides the key controls in places people don’t expect. Once you understand how page numbers in Word really work, you’ll be able to control exactly where they start, what number they show, and which pages stay unnumbered.
In this blog, I’ll walk you through clear, practical examples I use in training, so you can add page numbering in Word with confidence and stop wrestling with it once and for all.
The examples utilise a practice workbook named Word Page Numbering.docx. A link is provided below to download a copy for following along.
Tip: If your document includes a Table of Contents, remember to update it after renumbering your pages so the page numbers stay accurate.
Add Page Numbering in Word Practice File
Download the practice file if you’d like to follow along.
What Are Page Numbers in Word?
Page numbers in Word are automatic fields, not typed numbers. They live inside the header or footer, which is why they can sometimes feel “out of control”. When you change something in a header or footer, Word often applies that change across multiple pages — sometimes more than you expect.
The critical thing to understand is this:
- Word treats your document as one continuous section unless you tell it otherwise.
- Page numbering follows section rules, not page rules.
That’s why simply clicking Insert > Page Number often isn’t enough when you want numbering to start on page 2 or page 3. To do that, you need to understand Different First Page and Section Breaks — which I’ll show you step by step below.
Tip: If page numbering ever feels confusing, jump straight to the examples — that’s where things usually “click”.
How Do I Use Page Numbers in Word?
Before we get into the examples, here are the four rules I teach in training. If you remember these, page numbering becomes much easier.
- Page numbers sit in headers and footers
- Different First Page controls numbering on the first page of a section
- Section Breaks let different parts of the document behave differently
- Format Page Numbers controls what number Word starts counting from
You don’t need advanced Word skills — just these core ideas applied in the right order.
Practical Examples
Example 1: Insert Page Numbers in Word (on every page)
Scenario
You’ve written a multi‑page document and want page numbers on every page, so it’s easier to read and print.
How to use (step‑by‑step):
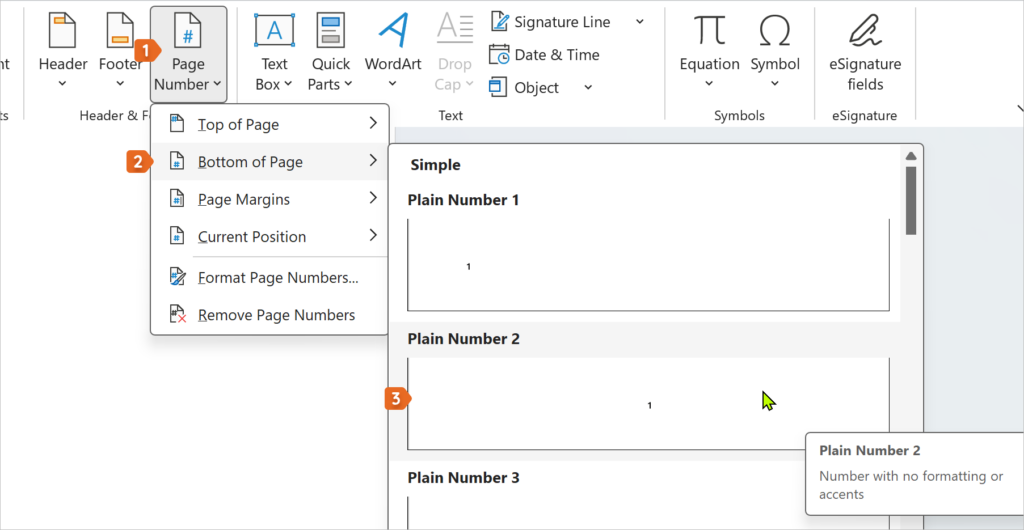
- From the Insert tab, click Page Number.
- Choose where you would like the page numbers placed, e.g. Top of Page or Bottom of Page.
- Select a style (e.g. Plain Number 2).
- Press Esc or click Close Header and Footer to exit the Header and Footer area.
Summary
This adds page numbers to every page in your document using Word’s default numbering.
Quick notes / tips / pitfalls
- If the font looks different, it’s because headers and footers have their own formatting.
- Switch to View > Print Layout if you can’t see the numbers clearly.
Example 2: Remove Page Number from the First Page
Scenario
Your document has a cover page, and you don’t want a page number on it.
How to use:
- Go to the Insert tab and click Header or Footer, depending on where you want the page number placed.
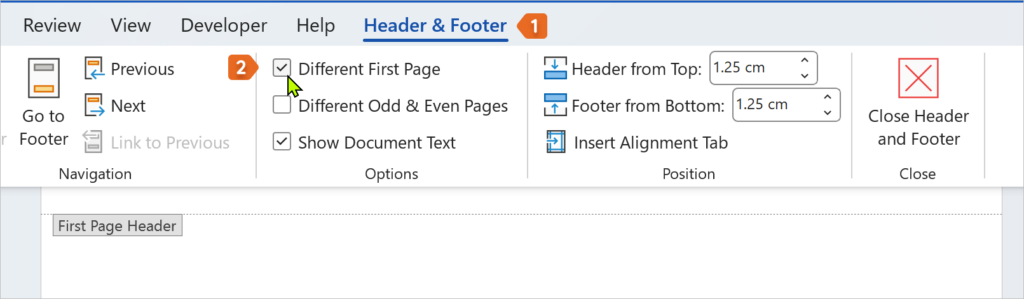
- Tick Different First Page. The page number on page 1 will be hidden, and page numbering will start on page 2. Note: if you want the page number on page 2 to show as page 1, refer to Example 3 below.
- Press Esc or click Close Header and Footer to exit the Header and Footer area.
Summary
The first page stays clean, while the rest of the document keeps numbering.
Quick notes / tips / pitfalls
- “Different First Page” can be applied per section, not just on page 1 of the whole document.
Example 3: Start Page Numbers on Page 2 (Show as Page 1)
Scenario
You have a cover page, and you want page 2 to display as page 1.
How to use:
- Insert page numbers (Insert tab > Page Number).
- Open the header/footer area (Insert tab > Header or Footer > Edit Header or Edit Footer).
- Place a check mark in “Different First Page”.
- On the Header and Footer tab > Format Page Numbers.
- Set Start at to 0.
- Click OK and then press ESC to leave the header and footer area.

Summary
Page 1 will remain free of page numbers, and page 2 will correctly show as page 1.
Quick notes / tips / pitfalls
- This works best when you only need to treat the first page differently.
- If page 2 still shows 2, double‑check your Start at value.
Example 4: Start Page Numbers on Page 3 (Show As Page 1)
Scenario
Page 1 is a cover page, page 2 is a contents page, and your main document starts on page 3 — which should display as page 1.
How to use:
- Click at the end of page 2. If a page break separates page 2 from page 3, delete it.
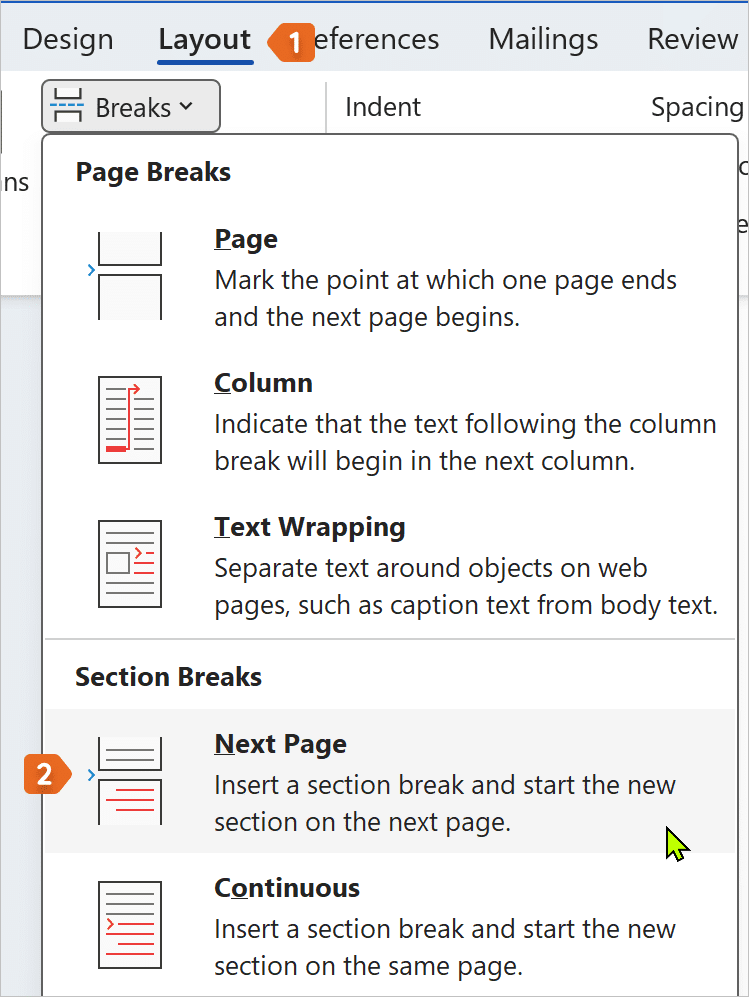
- With your cursor still at the end of page 2, go to Layout > Breaks > Next Page.
- Go to page 3 and open the header/footer area.
- Turn off Link to Previous.
- From the Header and Footer tab > Page Numbers > insert page numbers.
- Go to Format Page Numbers.
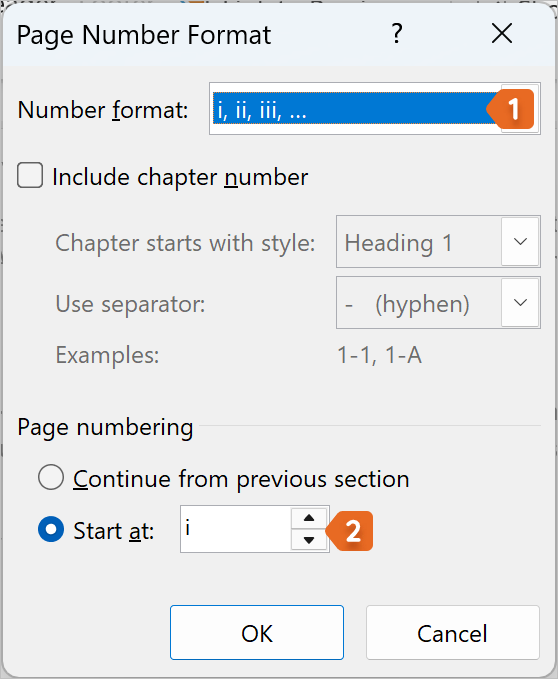
- Set Start at: 1.
- Click OK and then press ESC to leave the header and footer area.
Summary
This is the correct way to start numbering on a specific page using section breaks.
Quick notes / tips / pitfalls
- A page break is not the same as a section break.
- Forgetting to turn off Link to Previous is the most common mistake.
Example 5: Different Numbering Styles in Different Sections
Scenario
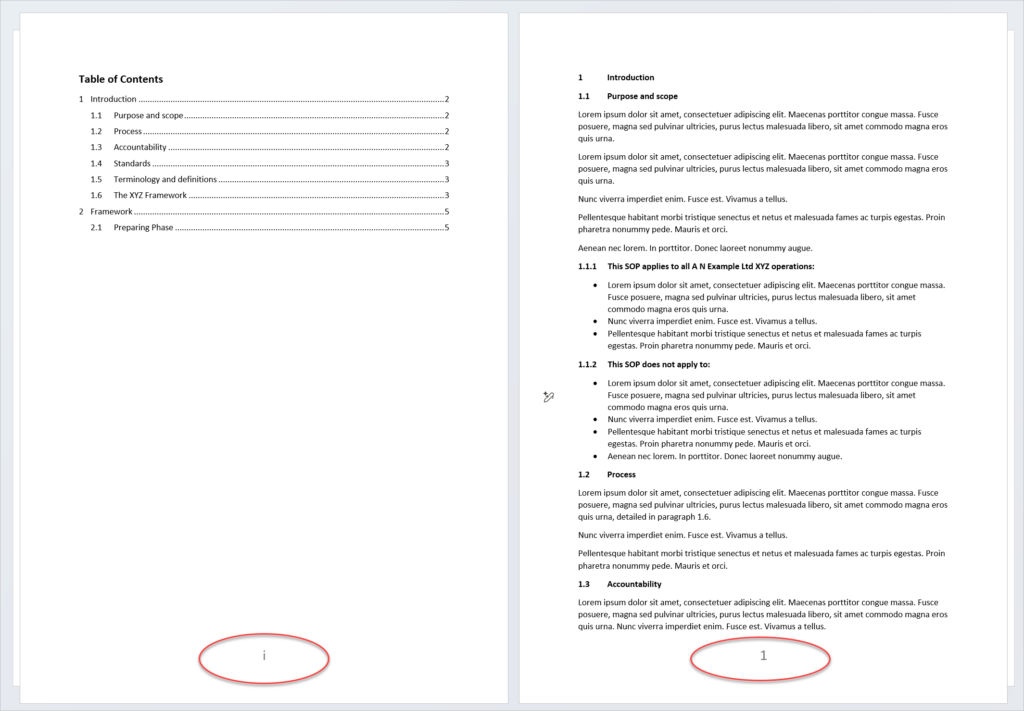
You want Roman numerals (i, ii, iii) for introductory pages and normal numbers starting at 1 for the main content.
How to use:
- Insert a Next Page section break where the numbering should change.
- Open the header/footer in the new section.
- Turn off Link to Previous.
- Add page numbers to each section.
- Use Format Page Numbers to choose styles and restart numbering.
6. Click OK and press ESC to leave the Header and Footer area.
Summary
Sections allow multiple numbering styles within one document — ideal for reports and manuals.
Quick notes / tips / pitfalls
- Headers and footers may need to be unlinked separately.
- Check each section carefully before closing the document.
Troubleshooting & Tips
Problem: Page numbers won’t start where expected
- Fix: Use a Next Page section break, not a page break.
Problem: Page numbers repeat or reset unexpectedly
- Fix: Check for extra section breaks.
Problem: Numbers appear on the cover page
- Fix: Use Different First Page.
Problem: Formatting keeps changing
- Fix: Turn off Link to Previous.
Problem: Numbers disappear
- Fix: Re‑insert them via Insert > Page Number.
FAQs
Q: How do I insert page numbers in Word?
A: Use Insert > Page Number and choose your layout.
Q: How do I remove page numbers from the first page only?
A: Enable Different First Page in the header/footer.
Q: How do I start page numbers on page 3?
A: Insert a Next Page section break, unlink headers, and restart numbering.
Q: Why do my page numbers restart randomly?
A: There’s likely a section break you didn’t intend to add.
Q: Can I have different styles of page numbers?
A: Yes, using section breaks and Format Page Numbers.
Q: Do I have to type page numbers manually?
A: No — always use Word’s page number field.
References
- Microsoft Support – Insert and manage page numbers in Word
Watch The Excel Video Tutorial
[Watch on YouTube] / [Subscribe to our YouTube Channel]
Word Practice File Download
Conclusion
Once you understand how Word uses headers, footers, and sections, page numbering becomes predictable instead of frustrating. These are the same steps I show in my training sessions — and the relief people feel when it finally makes sense is huge.
If page numbers have ever cost you time or confidence, now you know the fix.
Want to feel more confident with Microsoft 365?
Join my super-popular self-paced courses, and learn how to use Excel, Word and Copilot to save time and work smarter every day.
Or, book a live online coaching session with me to improve your skills and address any personal challenges.
If you’re not yet ready to take a course, I’m here to support you! Check out my YouTube tutorials and blog articles—they’re designed to help you build your skills and confidence. Let’s embark on your learning journey together!
YouTube: https://www.youtube.com/c/excelatwork
Search my Blog: https://www.excelatwork.co.nz/blog/

Certified Microsoft Office Specialist
Was this blog helpful? I’m here to empower your journey with Excel, aiming to make your daily tasks more efficient and boost your potential.
Share your thoughts in the Comments below – your insights not only enrich others, they also help me tailor future content to your needs.
And if you’re looking to take a step further, join our exclusive ‘Insider Group‘. As a member, you’ll receive Weekly Super-Tips, and early access to in-depth tutorials. Sign up Today!
Happy Excel-ling!!


