Learning how to insert and format Table of Contents in Microsoft Word is a fantastic way to keep things organised and easy to navigate. It’s like a guide that helps you and your readers quickly find different sections of your document.
If you’re reading a long report or research paper, a Table of Contents makes it easy to find specific information. But with this feature, you can quickly jump to any part of the document with just a click. It saves time and makes your document look polished and professional.
Making a Table of Contents in Microsoft Word is simple and only takes a few steps. Plus, it automatically updates as you make changes to your document, so you don’t have to worry about manually adjusting it.
Whether it’s for a school project, business report, or personal document, a Table of Contents makes your work easier to read. So go ahead and give it a try – your readers will thank you for it!
Excel Practice Files
Table of Contents Example
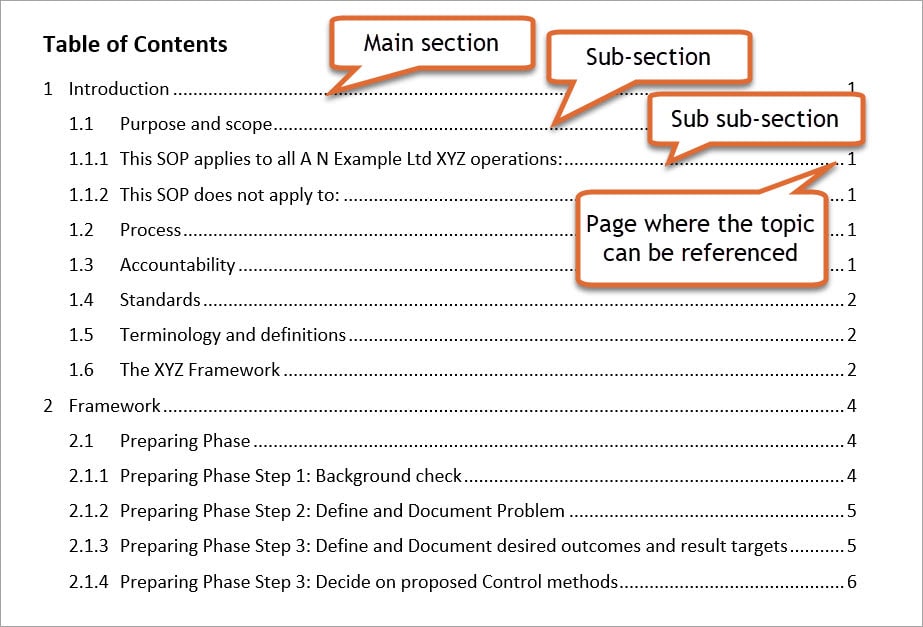
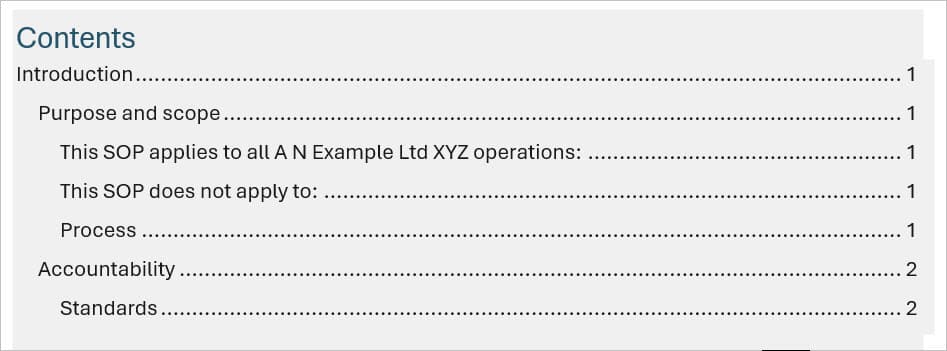
In the example below, the Table of Contents includes all sections and sub-sections of the document. Should the document be modified, the Table of Contents can be regenerated within seconds!
Create a Table of Contents in Word
You can create a Table of Contents in Word by following these three simple steps.
Step 1: Add Headings And Subheadings To Document
Step 2: Create A Table Of Contents Using The Heading Styles
Step 3: Change The Format Of The Table Of Contents To Suit The Style of Your Document
1. Create Headings And Subheadings In Word
Use the heading styles ‘Heading 1’ and ‘Heading 2’, etc, to organise your Table of Contents.
For example, if your document consists of main sections and subsections, you will use Heading 1 for the main section headings, Heading 2 for the subsection headings within those sections, Heading 3 for sub-subsections, and so on.

Using these different heading styles helps Word create a Table of Contents that is easy to read. It organises all the sections and sub-sections so you can quickly find what you’re looking for.
Apply The Heading 1 Style
Heading 1 styles indicate the main topics or sections within your document. When you apply this style to text, it means you are marking it as a primary section. This is essential for building a Table of Contents because Word uses these Heading 1 styles to identify and list the main sections, ensuring your document is well-organised.
Here are the steps to change a heading to a Heading 1 style in Microsoft Word:
1. Select the text you want to format as a Heading 1.

2. Go to the ‘Home’ tab on the Ribbon [2].
3. In the ‘Styles’ group, locate the Styles Gallery [3].
4. If you don’t see ‘Heading 1’ in the visible styles, click the down arrow [4] to expand the gallery to see more options.
Tip: you can also access heading styles on the Styles Pane. To open the Styles Pane, click the dialog box launcher arrow on the ‘Styles’ group or press ALT + CTRL + SHIFT +S.
5. Click on ‘Heading 1’ [5]. The selected text will now be formatted as a Heading 1, giving it a distinctive style and marking it as a primary section in your document.

Repeat the above steps for each main heading in your document to include it in the Table of Contents. For more details, see the section ‘Copy Heading Styles With The Format Painter in Word.’
Note: When you apply the Heading 1 style to a heading, it will automatically use the default settings for font style, size, colour, and paragraph layout. If you want to change how the Heading 1 style looks to match your document, follow the steps in the section called ‘Modify Heading Style Format In Word‘.
Create Subheadings In Word
When your document requires further subdivisions, you can use Heading 2, Heading 3, and subsequent heading levels to create subheadings and sub-subheadings.
Here are the steps to create subheadings and sub-subheadings in Microsoft Word:
1. Select the text you want to format as a subheading.
2. Go to the ‘Home’ tab on the Ribbon.
3. Locate the Styles Gallery in the ‘Styles’ group. If ‘Heading 2’ is not visible, click the down arrow to expand the gallery to see more options.
4. Click on ‘Heading 2’. The selected text will now be formatted as a Heading 2, marking it as a subsection of your main section.
5. For Sub-subheadings (Heading 3, etc), repeat the process by selecting the text for your sub-subsection, navigating to the ‘Home’ tab, and choosing ‘Heading 3’ from the Styles Gallery.
Copy Heading Styles With The Format Painter In Word
To apply the same style to other headings in your document using the Format Painter, follow these steps:
1. Select the heading that already has the style you want to copy.
2. Go to the ‘Home’ tab on the Ribbon.
3. In the ‘Clipboard’ group, locate the ‘Format Painter’ button.

- To apply the style to one heading, click once on the ‘Format Painter’ button.
- To apply the style to multiple headings, double-click on the ‘Format Painter’ button.
4. Highlight each heading or text you want to apply the copied style to.

5. The selected text will now have the same style as the original heading.

Note: in the example above the predefined style settings for Heading 1 have affected the heading numbering sequence. To fix this follow the steps in the section called ‘Modify Heading Style Format In Word‘.
Quickly Apply Heading Styles Shortcut Key
If you find the Format Painter option a bit confusing, you can try this simpler method:
1. Select a heading and apply the correct heading style.
2. To apply the same style to another heading, click the heading and then press F4. The F4 key repeats the last action you performed.
Modify Heading Style Format In Word
If the default heading styles in Word don’t match the style of your document, you can change them to fit your style. For example, if your headings are formatted with Arial 14pt, bold, and 6pt spacing, you can update the Heading styles to keep this formatting consistent throughout your document.
To modify a heading style format in Word:
1. Select the heading that is already formatted as you want it.
2. On the Home tab, in the ‘Style Gallery’, right-click on the heading style.
3. Select ‘Update [style name] to Match Selection’.

4. This action will update the heading style with the formatting already applied to your selected heading, allowing you to personalise the appearance of your headings while including the heading in the Table of Contents.

5. Use the same steps to update the Heading 2 and Heading 3 styles if required.
6. With the Heading style updated, continue through the document, applying the style to any heading that will be included in the Table of Contents.
2. Create A Table Of Contents
Inserting a Table of Contents in Microsoft Word is simple. You can use built-in options to automatically generate a Table of Contents with pre-styled headings. For more control, choose ‘Custom Table of Contents’ to select heading levels and customize formatting according to your needs.
Use Built In Table Of Contents In Word
Using the built-in Table of Contents (TOC) option in Microsoft Word is quick and easy. With just one click, it automatically generates a TOC based on your document’s headings, ensuring consistent formatting and saving you time and effort.
This option is perfect if you’re happy with the preset formats Word offers. However, if you require further customization, check the section on inserting a custom table of contents. It’s particularly useful for lengthy documents that require frequent updates.
1. Place the insertion point at the location in your document where you want the Table of Contents to appear. Typically, this is at the beginning or near the beginning of the document.
2. Click the References tab.
3. Click Table of Contents. A list of preformatted Table of Contents options will be displayed. Click on the one that best suits your document’s style and formatting needs. This will insert a placeholder for the Table of Contents at the insertion point location.

4. After inserting the placeholder, Word will automatically scan your document and generate the Table of Contents based on the headings and their associated heading styles. The Table of Contents will include the headings and subheadings that have been styled using the appropriate heading styles, such as Heading 1, Heading 2, and so on.
Note: The built-in Table of Contents options are pre-styled, meaning you get default formats. To customise the Table of Contents, please refer to ‘How to Insert a Custom Table of Contents in Word’. To change the formatting, i.e., font style and indents, see ‘How To Format A Table Of Contents In Word’.
How To Insert A Custom Table Of Contents In Word
If the built-in Table of Contents options do not meet your specific requirements, you have the flexibility to insert a customised Table of Contents in Microsoft Word. To do so, follow the steps below to create a Table of Contents tailored to your preferences:
1. Place the insertion point at the desired location in your document where you want the Table of Contents to be inserted.
2. On the References tab, click the Table of Contents button.
3. From the dropdown menu, select Custom Table of Contents at the bottom. This will open the Table of Contents dialog box. From here, you can customise various aspects of the Table of Contents:

Control Page Numbers
Customise how the page numbers are displayed [1]. To display only the headings without page numbers, uncheck the option “Show page numbers.” This is useful when you want a simplified Table of Contents without numerical references. If you prefer to place the page number directly after the heading name, remove the check from “Right align page numbers.”
Select A Tab Leader Style In Table Of Contents
Select a different Tab leader [2]. Select the type of leader (dots, dashes, or lines) to guide the reader’s eye between the headings and page numbers.
Show Levels included in the Table of Contents
Choose the number of levels you want to include in the Table of Contents [3]. For example, from the Show levels option, if you select “1,” only Heading 1 will be included; if you select “2,” both Heading 1 and Heading 2 will be included, and so on.
Insert Hyperlinks In Table Of Contents
Use hyperlinks instead of page numbers [4]. Use this option if you are saving the document as a PDF or web page. By default, headings will be saved as hyperlinks. This feature allows readers to click on the headings within the Table of Contents, which then takes them directly to the corresponding section or page in the document. This is especially useful if you plan to save the document as a PDF, as it ensures the Table of Contents remains clickable, guiding readers effortlessly to the appropriate pages.
3. How To Format A Table Of Contents In Word
Once the Table of Contents (TOC) has been inserted, Word automatically applies TOC1, TOC2, TOC3, etc. styles to the Table of Contents text. These styles come with default formatting settings. If these defaults do not match the style of your document, they can be updated.
For example, you may require the indent settings to be flush with the left margin. When you change the indent settings for the TOC styles, the settings will remain the same each time you update the Table of Contents.
To change the format of the TOC styles:
1. Then, right-click the style name in the Style Gallery or in the Style Pane and select “Update [style name] to match selection” [2].
2. Select the text in the Table of Contents that is currently formatted using a TOC1, TOC2, etc. style [1].
3. Change the format of the entry as desired. For example, reset the left indent to 0 to ensure all text formatted using the style will be formatted flush with the left margin.

This process ensures that the TOC entries align perfectly with your document’s design preferences, and the formats remain the same each time the Table of Contents is updated.
How to Update a Table of Contents in Word
Remember to update your Table of Contents if you change the headings or content in your document. This ensures that the table accurately reflects the current document structure and page numbers.
For example, if you have added, removed, or rearranged headings or if you have inserted or deleted pages, updating the Table of Contents is necessary to reflect these changes.
To update the Table of Contents, simply click anywhere within the Table of Contents and then do one of the following:
- For the Table of Contents generated using Word’s built-in options, click Update Table from the menu.

- Press F9.
- Right-click and then select Update Field.
You can then choose to update the page numbers only or update the entire table. Select ‘Update entire table’ if you have modified, added, or deleted headings, as this will ensure that the Table of Contents reflects all the changes. On the other hand, if you have only added or deleted content and your headings have moved to different page numbers, selecting ‘Update page numbers only’ is sufficient.
How To Edit A Table Of Contents In Word
Editing a Table of Contents in Word is essential when modifying its content.
For example, let’s say you have updated a report and included sub-headings formatted with Heading 2 styles. However, the Table of Contents has been inserted to only display headings formatted with Heading 1 styles. By editing the Table of Contents, you can change the Show levels option to include the Heading 2 headings.

To edit a Table of Contents in Word:
- Click anywhere within the Table of Contents to select it.
- From the References tab, click Table of Contents.
- Select Custom Table of Contents.
- Refer back to the steps in ‘How To Insert A Custom Table Of Contents In Word’ to tailor the Table of Contents to your specific requirements.
How To Delete A Table Of Contents In Word
There are instances when you might need to delete a Table of Contents in Word. One common scenario is when you make significant changes to the structure or content of your document, rendering the existing Table of Contents outdated or irrelevant.
Deleting the existing Table of Contents and creating a new one ensures accuracy and reflects the updated content and structure of your document.
- Click anywhere in the Table of Contents area.
- From the References tab, click Table of Contents.
- Select Remove Table of Contents.
Conclusion
In conclusion, creating a Table of Contents in Word is a simple and helpful way to make your document easier to read and navigate. It helps readers find information quickly and saves time. By following these easy steps, you can provide your readers with a clear guide to navigate through your content effortlessly.
Watch The Excel Video Tutorial
[Watch on YouTube] / [Subscribe to our YouTube Channel]
Excel Practice File Download

Certified Microsoft Office Specialist
Was this blog helpful? I’m here to empower your journey with Excel, aiming to make your daily tasks more efficient and boost your potential.
Share your thoughts in the Comments below – your insights not only enrich others, they also help me tailor future content to your needs.
And if you’re looking to take a step further, join our exclusive ‘Insider Group‘. As a member, you’ll receive Weekly Super-Tips, and early access to in-depth tutorials. Sign up Today!
Happy Excel-ling!!