Have you ever used the TRIM formula, pressed Enter, and nothing happened? If the Trim function isn’t working in Excel, you’re not alone — it’s a common issue that even experienced users encounter.
There are two common reasons why the TRIM function isn’t working in Excel — either you’re dealing with spaces inside numbers, or you’ve got hidden characters that Excel doesn’t recognise as normal spaces.
In this guide, I’ll guide you through simple, beginner-friendly steps to remove these spaces using Excel’s Find and Replace tool.
These fixes are quick, effective, and ideal if you’ve been searching for: ‘trim function not working in Excel’, ‘how to remove spaces in Excel’, or ‘Excel clean up cells without formulas’!
Excel Practice Files
Why Isn’t the TRIM Function Working in Excel?
There may be several reasons why.
- If you’re trying to remove a space from a number, TRIM won’t work. I’ll explain more below in the section titled “How to Remove Spaces from Numbers Without Using Formulas”.
- The TRIM function only removes regular spaces. If your cells contain non-breaking spaces, also known as ‘hard spaces,’ TRIM won’t recognise or remove them. We’ll learn how to deal with this in the section below titled “Remove Spaces the Trim Function Misses in Excel”.
How to Remove Spaces from Numbers in Excel Without Using Formulas
There’s no doubt the TRIM function in Excel is an excellent tool for cleaning up messy data. But sometimes, it just doesn’t work the way you expect — especially with numbers.
Take this example:

Cell A4 contains what appears to be a number with a space in it. In B4, the TRIM function has been used to remove the space, but the space is still there. Why?
It’s because that extra space has turned the number into text, and TRIM is meant to remove extra spaces between words, leaving just one space. If there’s only one space, TRIM will leave it — that’s exactly how it’s designed to work.
Unfortunately, these unwanted spaces can cause calculation errors, display issues, and misaligned data.
Let’s look at how you can quickly remove spaces between numbers with a simple fix (no formula required) using Find and Replace.
Fix: Remove Spaces in Numbers Using Find and Replace
Use Find and Replace to remove the space entirely — no formulas needed. Just find the space and replace it with nothing.
Follow these steps:
- Select the cell or range of cells containing the number with hidden spaces.
- Press Ctrl + H to open the Find and Replace dialogue box.
- In the ‘Find what’ box, press the spacebar once. This will ask Excel to search your cell or range for single spaces.
- Leave the ‘Replace with’ box empty.
- Click ‘Replace All’. Excel will replace all spaces with nothing.
- Click ‘Close’.

Excel will find the unwanted spaces and replace them with nothing, transforming your number back to a number!

Still have spaces? Your spaces might be hard spaces. Follow the steps below for another method to remove those annoying spaces.
Remove Spaces the Trim Function Misses in Excel
If you’re noticing extra spaces and TRIM isn’t fixing them, you might have non-breaking spaces, also known as hard spaces.
These hidden characters are those that Excel’s TRIM function cannot remove.
TRIM is designed to only remove regular spaces.
Hard spaces and regular spaces are recognised as completely different characters in Excel. Hard spaces have a character code of 160. Regular spaces, a character code of 32.
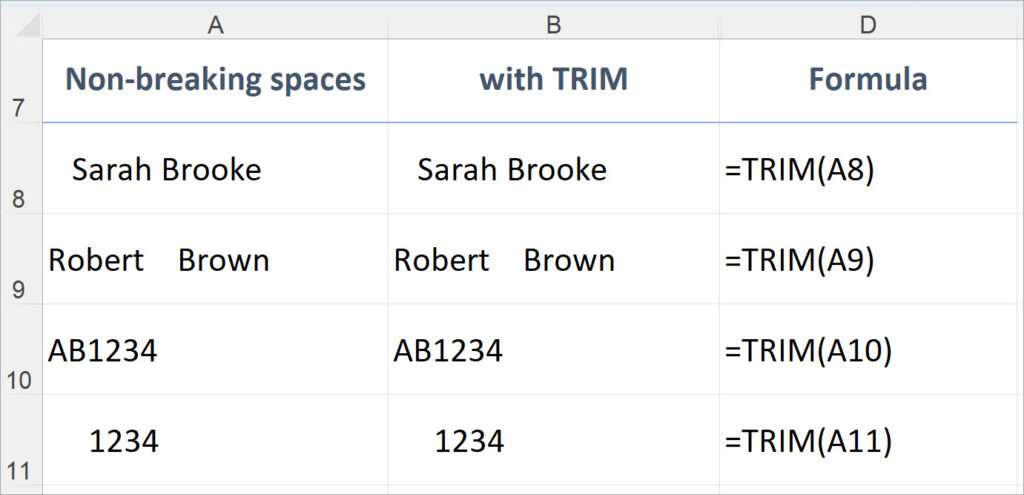
In the example below, the TRIM function has been used in column B to try to remove the spaces. As you can see, the spaces remain. This suggests that the spaces are most likely hard spaces, not regular spaces.
Hard spaces often sneak in when you copy data from websites, PDFs, or external systems — and they look just like normal spaces, but Excel treats them differently.
They usually arrive when copying from:
- Web pages
- PDFs
- External data systems like CRMs or accounting software
The good news? You can fix this — and you don’t need to write a single formula.
Let’s look at how to remove hard spaces in Excel using the Find and Replace feature, without needing a formula.
Fix: How to Remove Hard Spaces Excel’s TRIM Function Can’t Detect
Let’s use Find and Replace to remove the space entirely, as we did above. But this time we will need to add an extra step.
Follow these steps:
- Select a cell containing the number with hidden spaces.
- In the Formula bar, select only one of the troublesome spaces and then press Ctrl + C to copy the space.

- Select the cell or range of cells you want to clean (e.g. A8 to A11).
- Press Ctrl + H to open Find and Replace.
- Paste the copied space into the ‘Find what’ box (Ctrl + V).
- Press the spacebar once in the ‘Replace with’ box.
- Click ‘Replace All’
- Click ‘Close’.

- By copying and replacing that hidden space, you’ve told Excel to swap out the non-breaking space (which TRIM can’t detect) with a normal space — the kind TRIM can handle.
- Once the hard spaces are replaced, TRIM kicks in and does what it’s meant to do — removing any leading, trailing, or extra spaces between text. Your data is now clean, accurate, and ready to be used without causing frustrating errors!

Want a formula-based method to remove stubborn hard spaces in Excel?
If you’re regularly pasting data into Excel from PDFs, websites, or external systems, hard spaces can become a recurring issue. Save time by creating a small helper formula using the TRIM with the SUBSTITUTE function. It’s a quick way to clean data automatically without needing to run Find and Replace every time. Check out my tutorial on How to use TRIM with SUBSTITUTE in Excel — perfect for cleaning up large datasets quickly and automatically.
Watch The Excel Video Tutorial
Excel Practice File Download
Conclusion: How to Fix the Trim Function When It’s Not Working in Excel
If you’ve ever wondered why the TRIM function isn’t working in Excel, chances are your cells contain either:
- A single space in a number (which TRIM is designed to ignore), or
- Hard spaces (non-breaking spaces) that TRIM can’t detect at all.
The good news? Both issues are easy to fix — and you don’t need complex formulas to get the job done.
Here’s a quick recap:
- Use Find and Replace to clean up spaces inside numbers. This helps Excel treat the value as a number again, so your calculations work as expected.
- If TRIM fails to clean up text, it’s likely due to non-breaking spaces. In that case, simply copy the hard space, and replace it with a regular space using Find and Replace — and then let TRIM finish the job.
These quick fixes will help you confidently clean up your data, prevent calculation errors, and ensure your spreadsheet behaves as expected.
Now you’re ready to handle even the sneakiest of spaces like a pro!
TRIM function not working in Excel? Learn how to fix it fast using Find and Replace — no formulas required! Step-by-step guide perfect for beginners and busy professionals.
Was this Blog helpful? Let me know in the comments below.
Want to Learn Excel Properly?
Join the Excel at Work Learning Hub

The Excel at Work Learning Hub is an online self-paced Excel training membership designed for people who use Excel at work—in offices, on sites, in schools, in small businesses, and everywhere in between.
Go from Beginner to Confident – Guaranteed!
Only $59NZ /month
Cancel anytime • No pressure • 14-day 100% Money Back Guarantee

Certified Microsoft Office Specialist
Was this blog helpful? I’m here to empower your journey with Excel, aiming to make your daily tasks more efficient and boost your potential.
Share your thoughts in the Comments below – your insights not only enrich others, they also help me tailor future content to your needs.
And if you’re looking to take a step further, join our exclusive ‘Insider Group‘. As a member, you’ll receive Weekly Super-Tips, and early access to in-depth tutorials. Sign up Today!
Happy Excel-ling!!