Inserting a Table of Contents into your Word document is more than just a mere convenience – it's a game-changer.
Acting as a navigational roadmap, it transforms your document into an easy to read, organised masterpiece. By offering a clear overview of the document's structure, it becomes a time-saving companion, enabling readers to swiftly find the information they need.
The Power of Microsoft Word's Automatic Table of Contents
Imagine tackling a lengthy Standard Operation Procedure (SOP) document with countless sections and subsections. Without a Table of Contents, the task of locating specific topics or jumping to relevant sections becomes a daunting challenge.
This is where Microsoft Word's automatic Table of Contents feature comes to the rescue.
Not only does it alleviate the burden of manually creating a Table of Contents, but it also ensures that it stays accurate even as you update the document.
With just a few clicks, your Table of Contents is generated seamlessly, saving you valuable time and effort.
Table of Contents Example
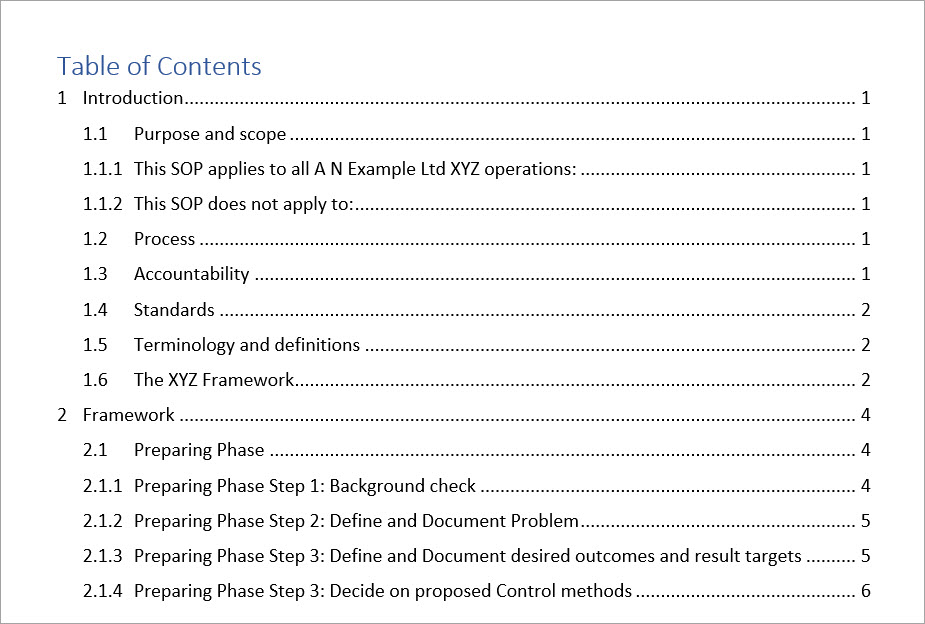
In the Table of Contents example below the content has been automatically generated to include the different sections, sub-sections, and sub-sub-sections within the document. Should the document be modified, the Table of Contents can be regenerated within seconds!

So, whether you're crafting a SOP, a research paper, a complex report, or any other document requiring structured navigation, let Microsoft Word's automatic Table of Contents be your guiding companion, making your content easily accessible and your readers eternally grateful.
Create a Table of Contents in Word
In this article we will look at an easy 3-step process for creating a Table of Contents in a Microsoft Word document.
Step 1: Apply the Heading 1 Style to All Main Headings
Step 2: Apply Heading styles to All Sub-Headings
Step 3: Insert a Table of Contents in Word
I’ve also boosted this article for you and included additional steps to help you become a Table of Contents wizard. These include how to:
- Update the Heading Styles to Adopt the Formatting from the Selected Heading
- Insert a Custom Table of Contents
- Control page numbers, tab leaders and heading levels shown in a Table of Contents
- Format the text in the Table of Contents
- Update a Table of Contents in Word
- Edit a Table of Contents in Word
- Delete a Table of Contents in Word
Add Text to the Table of Contents using Heading Styles
To ensure the accuracy and functionality of your Table of Contents in Microsoft Word, it is essential to format the document's headings using Word’s built-in Heading styles. These heading styles can be found in Word's Styles Gallery, conveniently located on the Home tab.

To locate specific heading styles like ‘Heading 2’ and ‘Heading 3’, simply click the spinner down arrow on the right side of the Style Gallery. This will reveal the full range of available heading styles.

Heading styles, such as ‘Heading 1’, ‘Heading 2’, and so on, play a crucial role in assigning various levels of importance and hierarchy to your headings. Each heading style represents a distinct level, with Heading 1 being the highest level and subsequent styles indicating lower levels of importance.
For example, if your document consists of main sections and subsections, you will utilise Heading 1 for the main section headings, Heading 2 for the subsection headings within those sections, Heading 3 for sub-subsections, and so on.
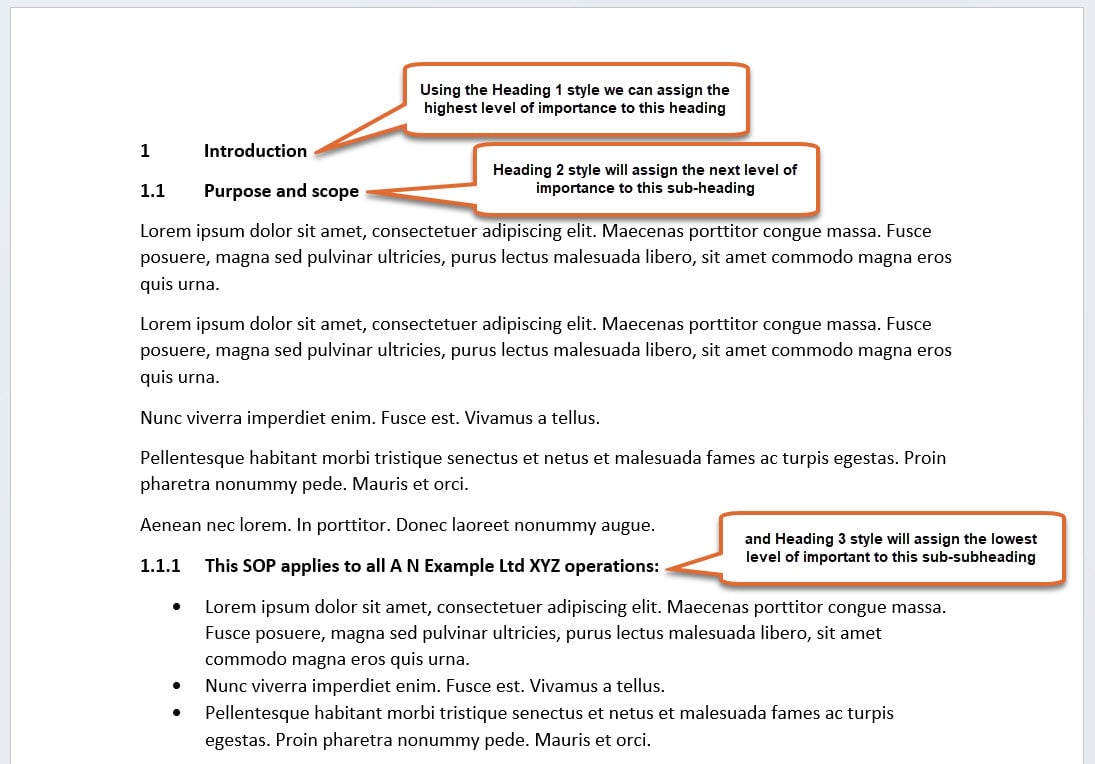
This hierarchical structure enables Word to accurately generate a Table of Contents, seamlessly organising each heading level and providing readers with a clear overview and easy navigation throughout the document.
By following this structured approach, you can create an organised and functional Table of Contents that enhances readability and enhances the overall user experience.
Step 1: Apply the Heading 1 Style to All Main Headings
1. Select the first main heading by clicking anywhere within the paragraph.

2. From the Home tab, locate the ‘Heading 1’ style in the Styles gallery.

3. Click the ‘Heading 1’ style to apply the default format settings to your heading.
Note: Heading styles (e.g., Heading 1, Heading 2, etc.) come with predefined formats that are automatically applied when you assign the style to a paragraph or selected text. These default settings include preset formats for font style, size, colour, and paragraph settings. If you prefer to customise the formatting of the Heading 1 style, refer to the instructions on 'Update the Heading 1 Style to Adopt the Formatting from the Selected Heading' .

4. Repeat steps 1 and 2 for each level 1 heading throughout your document that needs to be included in the Table of Contents.
Step 2: Apply Heading Styles to All Sub-Headings
If your document includes subheadings, establish a clear hierarchy by using the appropriate heading styles. By applying the correct heading styles to your subheadings, you establish a clear hierarchy that will be reflected in the generated Table of Contents. Move through your document and select each heading individually.
Use the ‘Heading 2’ style for subheadings.

If you have subheadings within subheadings, use ‘Heading 3’, and so on.
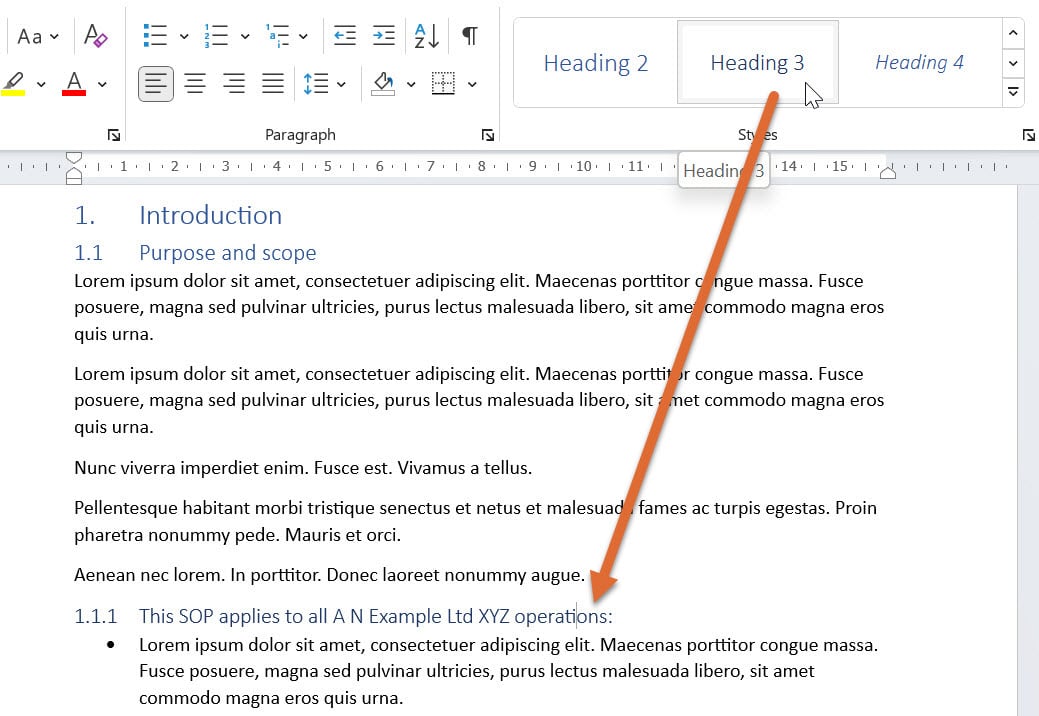
By applying the correct heading styles to your subheadings, you establish a clear hierarchy that will be reflected in the generated Table of Contents.
Optional: Update the Heading Styles to Adopt the Formatting from the Selected Heading
Instead of using the default Heading style formats in Word, you can update the Heading style to match the formatting already applied to your headings .
For instance, let's say your headings are already formatted perfectly with Arial 14pt font, bold, and 6pt paragraph spacing. By applying Word's default Heading styles to your headings, they will be automatically formatted using the predefined formats associated with each style.
However, if you prefer to maintain the existing formatting of your headings, you can update the Heading styles to adopt the desired formats. This way, you can ensure that your headings retain the exact formatting you desire throughout your document.
To do this:
1. Select the heading that is already formatted as you want it.
2. On the Home tab, in the Style Gallery, right-click on the style labelled ‘Heading 1’ and select then Update Heading 1 to Match Selection.

3. This action will update the Heading 1 style with the formatting already applied to your selected heading, allowing you to personalise the appearance of your headings while maintaining consistency throughout the document.
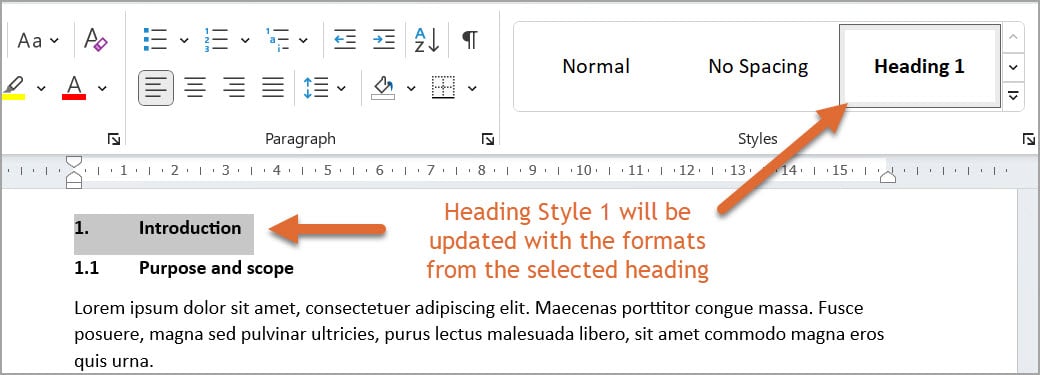
4. Use the same steps to update the Heading 2 and Heading 3 styles if required.
5. With the Heading style updated continue through the document applying the style to any heading that will be included in the Table of Contents.
Step 3: Insert a Table of Contents in Word
Inserting a Table of Contents in Microsoft Word is a straightforward process that can be completed in just a few simple steps.
In Word, you'll find convenient built-in options that automatically generate a Table of Contents with pre-styled headings, including Heading 1, Heading 2, and Heading 3 by default. This feature allows for a quick and hassle-free creation of a Table of Contents without any additional customization.
However, if you prefer more control over the Table of Contents and want to choose which headings to include or exclude, you can opt for the ‘Custom Table of Contents ’ option. This enables you to tailor the Table of Contents according to your specific needs by selecting desired heading levels, formatting options, and other customization settings.
With the flexibility provided by the custom Table of Contents feature, you can create a Table of Contents that perfectly aligns with the structure and style of your document.
Option 1: Insert a Table of Contents Using Preformatted Options
1. Place the insertion point at the location in your document where you want the Table of Contents to appear. Typically, this is at the beginning or near the beginning of the document.
2. Click the References tab.
3. Click Table of Contents. A list of preformatted Table of Contents options will be displayed. Click on the one that best suits your document's style and formatting needs. This will insert a placeholder for the Table of Contents at the insertion point location.
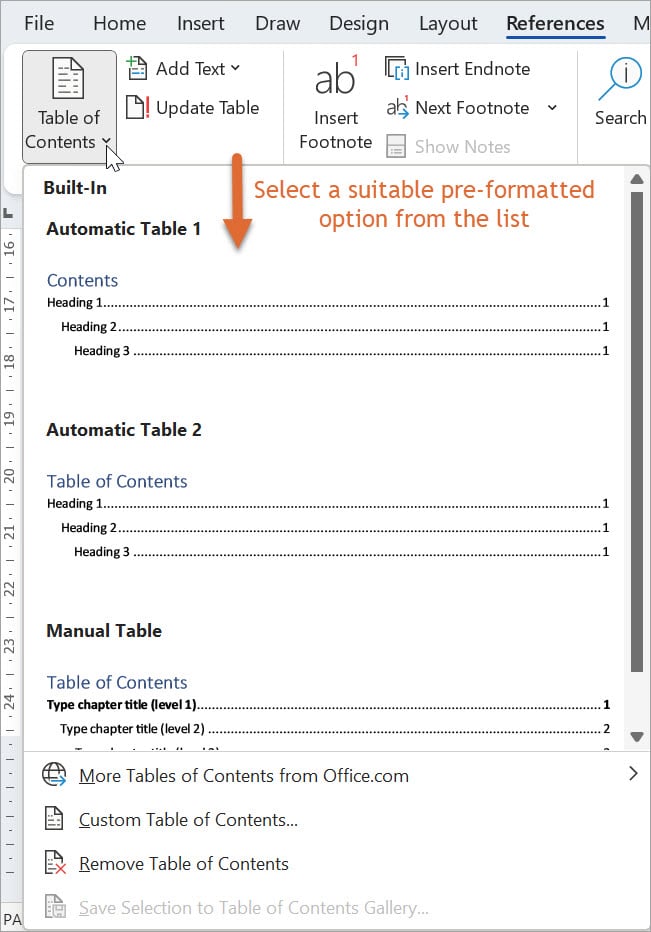
4. After inserting the placeholder, Word will automatically scan your document and generate the Table of Contents based on the headings and their associated heading styles. The Table of Contents will include the headings and subheadings that have been styled using the appropriate heading styles, such as Heading 1, Heading 2, and so on.
Option 2: Insert a Custom Table of Contents
If the pre-formatted options do not meet your specific requirements, you have the flexibility to insert a customised Table of Contents in Microsoft Word. To do so, follow the steps below to create a Table of Contents tailored to your preferences:
1. Place the insertion point at the desired location in your document where you want the Table of Contents to be inserted.
2. On the References tab, click the Table of Contents button.
3. From the dropdown menu, select Custom Table of Contents at the bottom. This will open the Table of Contents dialog box. From here you can customise various aspects of the Table of Contents:

Control page numbers
Customise how the page numbers are displayed. To display only the headings without page numbers, uncheck the option "Show page numbers." This is useful when you want a simplified Table of Contents without numerical references. If you prefer to place the page number directly after the heading name, remove the check from "Right align page numbers." This layout provides a clean and concise presentation of your Table of Contents.
Select a Tab leader
Select a different Tab leader. Select the type of leader (dots, dashes, or lines) to guide the reader's eye between the headings and page numbers.
Show Levels included in the Table of Contents
Choose the number of levels you want to include in the Table of Contents. For example, from the Show levels option, if you select "1," only Heading 1 will be included; if you select "2," both Heading 1 and Heading 2 will be included, and so on.
Use hyperlinks instead of page numbers
Use hyperlinks instead of page numbers. This feature allows readers to click on the headings within the Table of Contents, which then takes them directly to the corresponding section or page in the document. By utilising hyperlinks, you can create a more interactive and user-friendly experience, making it convenient for readers to navigate through your document with ease.
Format the text in the Table of Contents
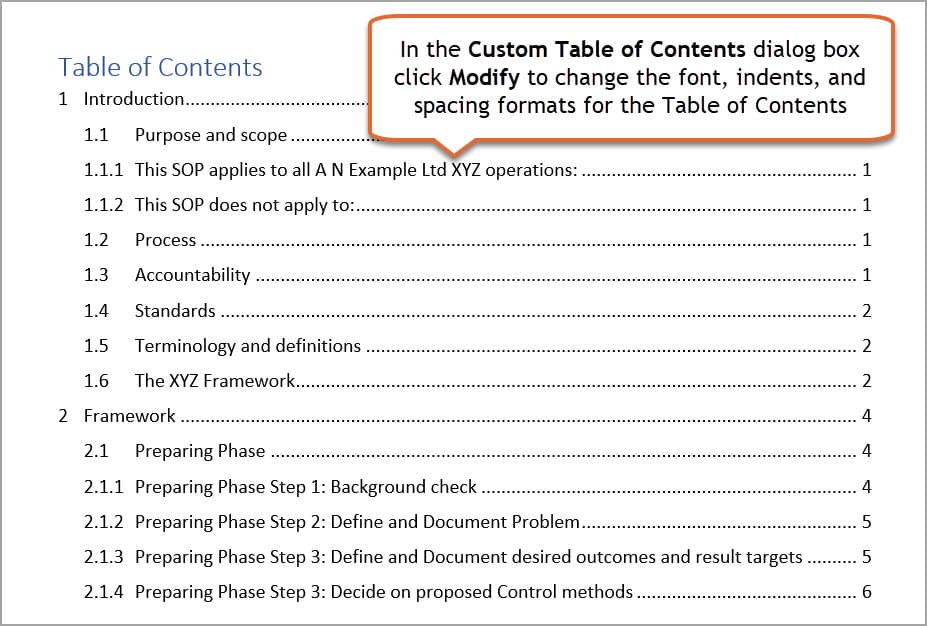
Modify the appearance of each heading level in the Table of Contents. You can change the look of your Table of Contents, such as font, alignment, and indentation, using preset options on the Formats option box. If you would prefer to create your own formats follow the steps below.
1. Click the Modify button. Word will display a list of styles. The TOC1 style will be applied to all entries created from a Heading 1 style. TOC 2 will be applied to all entries created from a Heading 2 style, and so on.

2. In the Styles list, click the style name you want to modify and then click Modify.
3. Click the Format button and then make the changes required. For example, to change the font style or size click Font. To change indents, paragraph or line spacing, click Paragraph.

4. After making your desired formatting changes, click OK to save the changes and insert the customised Table of Contents into your document.
By following these steps, you can easily insert a Table of Contents in Word, which will provide a comprehensive overview of your document's structure and facilitate quick navigation for readers
How to Update a Table of Contents in Word
It’s important to note that a Table of Contents may require updating if there have been changes made to the headings or content within your document. This ensures that the table accurately reflects the current document structure and page numbers.
For example, if you have added, removed, or rearranged headings or if you have inserted or deleted pages, updating the Table of Contents is necessary to reflect these changes.
To update the Table of Contents, simply click anywhere within the Table of Contents and then do one of the following:
- Click Update Table from the menu. If you created the Table of Contents as a Custom Table of Contents you may not see this option. Use one of the options below.
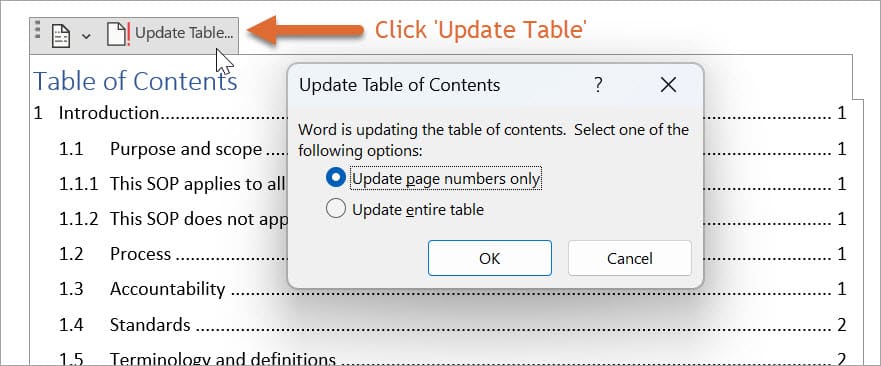
- Press F9.
- Right-click and then select Update Field.
You can then choose to update the page numbers only or update the entire table. Select ‘Update entire table’ if you have modified, added, or deleted headings, as this will ensure that the Table of Contents reflects all the changes. On the other hand, if you have only added or deleted content and your headings have moved to different page numbers, selecting ‘Update page numbers only’ is sufficient.
How to edit a Table of Contents in Word
Editing a Table of Contents in Word is essential when you need to modify its content.
For example, let's say you have updated a report and included sub-headings formatted with Heading 2 styles. However, the Table of Contents has been inserted to only display headings formatted with Heading 1 styles. By editing the Table of Contents, you can change the Show levels option to include the Heading 2 headings.
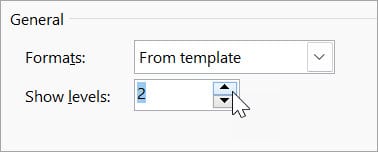
To edit a Table of Contents in Word, first, make sure you have the document open, and the Table of Contents displayed on the page.
1. Click anywhere within the Table of Contents to select it.
2. From the References tab click Table of Contents.
3. Select Custom Table of Contents.
4. Refer back to the steps in ‘Option 2: Insert a Custom Table of Contents ’ to tailor the Table of Contents to your specific requirements.
Word Table of Contents formatting
Formatting a Table of Contents in Word allows you to customise its appearance to match the style and design of your document.
You can tailor the formatting of your Table of Contents to your specific preferences. This includes choosing the heading levels to include, modifying the format of the table, and customising the appearance of page numbers or hyperlinks.
With these options, you can create a Table of Contents that not only provides clear navigation but also seamlessly integrates with the overall design of your document.
To change the formatting of an existing Table of Contents:
1. Click anywhere within the Table of Contents to select it.
2. From the References tab click Table of Contents.
3. Select Custom Table of Contents.
4. To explore more advanced formatting options and have greater control over your Table of Contents, refer back to the earlier steps in 'Option 2: Insert a Custom Table of Contents '.
Delete a Table of Contents in Word
There are instances when you might need to delete a Table of Contents in Word. One common scenario is when you make significant changes to the structure or content of your document, rendering the existing Table of Contents outdated or irrelevant.
For example, if you decide to reorganize the sections or headings, add or remove substantial portions of text, or modify the document's layout, deleting the existing Table of Contents and creating a new one ensures accuracy and reflects the updated content and structure of your document.
1. Click anywhere in the Table of Contents area.
2. From the References tab click Table of Contents.
3. Select Remove Table of Contents.
Conclusion
In conclusion, making a Table of Contents in Word is an easy and useful way to make your document easier to read and navigate. It helps people find information quickly and saves time. By following these three simple steps you can provide your readers with a clear roadmap to navigate through your content effortlessly.

