Managing dates efficiently in Excel can significantly boost your productivity. In this blog post, I’ll show you how to create a list of dates in Excel effortlessly using the powerful Autofill feature.
Whether you need a sequence of weekdays, months, or custom intervals, these tips will save you a lot of time! Let’s dive into the details.
Excel Practice Files
1. Autofill Days Of The Week In Excel
The Autofill feature makes creating a list of weekdays in Excel easy. This method helps you quickly generate schedules, logs, and other sequences.
Steps:
1. Enter the first day of the week (e.g., Monday) in cell A4.
2. Select cell A4 and position your mouse pointer over the fill handle (a small square at the bottom-right corner) until it turns into a black cross.

3. Click and drag the fill handle [3] to create a list of consecutive days [4].


Tip: Excel will fill the series using the same case as the day entered in cell A4. For example, if you enter the day in capitals, e.g. MONDAY, the series will be displayed as TUESDAY, WEDNESDAY, and so on.
2. Autofill Only Week Days In Excel
Sometimes, you may need a series that excludes weekends. Here’s how you can autofill only weekdays in Excel.
Steps:
1. Enter the first weekday (e.g., Monday) in the starting cell.
2. Use the fill handle to drag and create a list of days.
3. Click the Auto Fill Options button near the bottom right of the filled cells.
4. Select “Fill Weekdays” from the menu to exclude weekends from the series

3. Create Abbreviated Day Names in Excel
Occasionally, using abbreviated names for days is more convenient, particularly when working with narrow columns. Here’s how to craft a list of short-day names.
Steps:
1. Enter the three-character abbreviation of the first day (e.g., Mon) in the desired cell.

2. Select the cell and drag the fill handle to create the list.

Tip: The Auto Fill Options can still be used to create a sequence of weekdays only if needed.
3. Auto fill Every Second Day in Excel
Steps:
1. Enter the initial dates representing your desired interval (e.g., Wed and Fri).
2. Select both cells containing the dates.

3. Drag the fill handle to extend the series, creating a list of every second day.

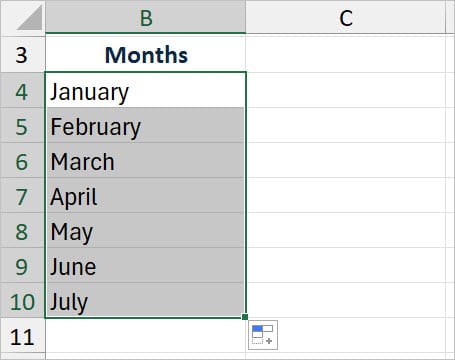
4. Autofill Months of the Year
Autofill in Excel quickly creates a list of months. Just enter the first month and drag the fill handle to generate the rest.
Steps:
1. Enter “January” in the starting cell.
2. Select the cell and drag the fill handle down to autofill the list of months.
Tip: Enter “Jan” for abbreviated months and follow the same steps above.
5. Auto fill Quarter Dates in Excel
Filling in quarterly months is perfect for financial reports and seasonal planning.
Steps:
1. Enter “Jan” and “Apr” in consecutive cells.
2. Select both cells and drag the fill handle down to extend the series.
3. Excel will create a sequence with quarterly intervals (e.g., Jan, Apr, Jul, Oct).

6. Autofill Week Starting Date
Autofill isn’t limited to text; it works seamlessly with actual dates as well.
1. Enter the start date (e.g., “20/05/2025”) in the first cell.
2. Enter the next date in the sequence (e.g., “27/05/2025”).
3. Select both dates, then drag the fill handle down to create a series of dates that are seven days apart.

7. Auto fill Same Day Each Month
1. Enter a date (e.g., “20/05/2025”) in the first cell.
2. Select the cell and drag the fill handle down.
3. Adjust Auto Fill Options to “Fill Months”.

3. Excel will create a series on the same day each month.

8. Autofill Same Day Every Year
1. Start with a specific date (e.g., “20/05/2025”).
2. Select the cell and drag the fill handle down. Adjust Auto Fill Options to “Fill Years”.

3. Excel will create a series on the same date each year

Autofill Custom Dates in Excel
Creating a series of dates with specific intervals can be very useful for various planning and scheduling tasks.
Imagine wanting to create a list of phases for your project. By doing so, you can effortlessly record these dates into your spreadsheet whenever you plan or track the progress of your project. It’s a fantastic way to save time and ensure you have all the milestones noted accurately!
To create a custom list in Excel, follow these steps:
1. To start, enter the items you want to include in your custom list by typing them in a column one column in a worksheet.

Tip: enter a name for your list in the first cell in the list. This will be used to recall the list when we use Autofill.
2. Select the list, including the list name at the top of the list.
3. From the File tab, choose Options to open the Excel Options dialogue box.

4. Once in the Excel Options dialog box, navigate to the Advanced category [1]. Scroll down to find the General section [2], and click the Edit Custom Lists button [3].

5. You have several choices in the Custom Lists dialogue box. You could type the list items directly in the List entries box [1], separating them with commas, or you can easily import the list from the ranges of cells you’ve set up earlier [2]. To import, click the Import button [3].

6. After entering or importing the list items, your custom list will appear in the List entries box and the Custom lists box.
7. Click OK and OK again.
8. To use your custom list, type the first item from your list into a cell, then drag the fill handle

9. Excel will automatically fill the subsequent cells with the remaining items in your list. With custom lists, you will save a tremendous amount of time!

Tip: To ensure Autofill consistently uses your preferred case, start by entering the first list entry in the required case, e.g., lowercase or uppercase. This small step helps keep everything just the way you like it!
Watch The Excel Video Tutorial
[Watch on YouTube] / [Subscribe to our YouTube Channel]
Excel Practice File Download
Conclusion: Best Practice Autofill Dates in Excel
After exploring various techniques for Auto-filling dates in Excel, it’s clear that this tool can make managing dates much easier and more efficient.
Whether filling in days of the week, skipping weekends, or creating custom date series, these best practices will help you get the most out of Excel’s autofill feature. Remember, practice makes perfect, so don’t hesitate to experiment with these methods to find what works best for you. Try these tips and share your feedback in the comments below!
Want to Learn Excel Properly?
Join the Excel at Work Learning Hub
The Excel at Work Learning Hub is an online self-paced Excel training membership designed for people who use Excel at work—in offices, on sites, in schools, in small businesses, and everywhere in between.
Go from Beginner to Confident – Guaranteed!
Only $59NZ /month
Cancel anytime • No pressure • 14-day 100% Money Back Guarantee

Certified Microsoft Office Specialist
Was this blog helpful? I’m here to empower your journey with Excel, aiming to make your daily tasks more efficient and boost your potential.
Share your thoughts in the Comments below – your insights not only enrich others, they also help me tailor future content to your needs.
And if you’re looking to take a step further, join our exclusive ‘Insider Group‘. As a member, you’ll receive Weekly Super-Tips, and early access to in-depth tutorials. Sign up Today!
Happy Excel-ling!!