
Learn how to insert, delete and hide rows or columns in Excel.
Once the basic worksheet is completed and tested, it may be expanded by inserting additional columns and rows. Additionally you can easily remove information from view simply by hiding it.
Insert and delete columns and rows
When you insert columns and rows all existing calculations are updated as necessary to take into account any additions.
Similarly rows and columns can be deleted and existing calculations will adjust accordingly.
To insert rows or columns
1. Select where the new row or column is to be inserted. When inserting rows, make sure the cell you select is in the row that will be directly below the new inserted row. With columns make sure the cell you select is in the column that will be directly to the right of the new inserted column.
In the example below row 2 has been selected so that the new inserted row will be inserted above to create a gap row between the ‘Travel Expenses’ heading and ‘March’.
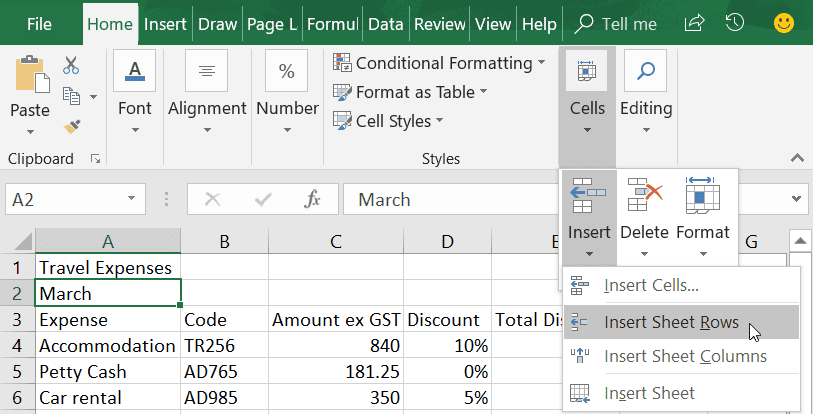
2. On the Home tab in the Cells group click Insert.
3. Select Insert Sheet Rows or Insert Sheet Columns.
To delete rows or columns
1. Select the row or column to be deleted.
2. On the Home tab in the Cells group click Delete.
3. Select Delete Sheet Rows or Delete Sheet Columns.
Tips: alternatively, right-click the column letter or row number and then select Insert or Delete. If you want to insert or delete more than one row, just select the number of rows required before you select Insert or Delete.

Keyboard shortcuts: to use a keyboard shortcut first select and entire column or row by left clicking the column letter or row number. Then press CTRL and the plus sign (+) to insert a row or column or CTRL and the minus sign (-) to delete a row or column.
Hiding rows or columns
There may be times when you want to hide a column or row from view. This is an excellent option to use if you don’t want to include the data when you print the worksheet.
To hide a column or row
1. Move your mouse pointer over the column letter or row number. The pointer will change to a black arrow. Click to select the entire row or column. If you want to hide multiple columns or rows drag your mouse across each of the columns or rows to be hidden.
2. Right-click the selected area and then select Hide from the shortcut menu. Hidden areas can normally be easily identified due to the fact that the row numbers or column letters are no longer sequential.
Tip: when you copy and paste ranges with hidden data everything is copied (including the hidden info). Check out my post on copy and paste excluding hidden columns or rows to learn how to copy only the information displayed, excluding the hidden data.
To unhide columns or rows
Unhide reveals a previously hidden column (or selection).
To unhide you can try to click and drag on the edges of the hidden column up in the heading row (2013 and 2016 only). If this is difficult just select the rows or columns on either side of the hidden row or column, e.g. if column C is hidden select columns B and D. Right-click and then select Unhide from the shortcut menu.
BONUS: Check out our detailed blog and YouTube video for more on ‘How to unhide columns‘ in Excel, including unhiding column A without unhiding ALL columns in the worksheet and how to unhide rows including row 1.
Was this blog helpful? Let us know in the Comments below.
If you enjoyed this post check out the related posts below.
Thanks, Sharon [a bunch]. Message from Arroyo Grande, California.
You are so welcome Dave. 👋 from Christchurch, New Zealand 😊